Advanced
Structured Query Language (SQL)/SQL*Plus
Oracle9i SQL*Plus
Tutorial
Author: DL
Last Updated: GS (02/11/10)
10.0 Variables in SQL
The define command allows you to create user variables in SQL.
The undefine command
allows you to delete user variables.
Reminder: all SQL and
SQL*Plus commands are case insensitive.
Examples
Try typing
the following at the SQL> prompt.
DEFINE job_type = 'CLERK'
Essentially
this define
command creates a variable called
job_type and assigns it the value 'CLERK' (a character string of type varchar2).
Define may also be used to display
the values of a specific user variable.
To do this
type DEF[INE]
at the SQL> prompt to list all the current definitions.
Try (and
observe)
SQL> def
SQL> def job_type
SQL> undefine
job_type
SQL> def
10.1 More on Defining User Variables
DEFINE
variable_name = 'sometext'
E.g.
DEFINE salary = '2000
DEFINE job_type = CLERK'
Note: even if you type
DEFINE salary
= 2000 SQL*Plus will assign to the variable salary a character string. Oracle
is rather 'relaxed' (sloppy?) about implicit data conversions.
Example
Enter
the following at the SQL> prompt
(It
is preferable to prepare a command file (script file) called, say, def1.sql and then use Start def1 or @def1
/* The SET COMMANDS WILL
BE EXPLAINED LATER */
SET DOC OFF
DEFINE sal_check = '1000'
DEFINE job_type = 'CLERK'
From emp
Where sal
< TO_NUMBER(&sal_check)
And job = '&job_type'
It is always good practice to delete the
definitions
if
they are no longer needed. See below.
~~~~~~~~~~~~~~~~~~~~~~~~~~~~~~~~~~~~~~~~~~~~~~~~~~
UNDEFINE
sal_check
UNDEFINE
job_type
And the output is :
old 3: Where sal
< &sal_check
new 3: Where sal
< 1000
old 4: And job
= '&job_type'
new 4: And job
= 'CLERK'
Press Return To
Continue =>
EMPNO ENAME SAL JOB
--------- ----------
--------- ---------
7369 SMITH 800 CLERK
7900 JAMES 950 CLERK
Note
that the display
old 3: Where sal
< &sal_check
new 3: Where sal
< 1000
old 4: And job
= '&job_type'
new 4: And job
= 'CLERK'
shows
the how the substitution process works. N.B. The
substitution of values for job_type and sal_check
is carried out before the command
is sent to the database engine.
N.B. You can disable the
display of 'old' and 'new' values by using the command SET
VERIFY OFF which is what you are now recommended to
do. Note that set verify off is included in your login.sql file and will be the
default.
Example
Enter the following
at the SQL> prompt (or of course prepare a command file called, say, def2.sql and
use Start def2 or
@def2
DEFINE remun
= 12*sal +
NVL(comm, 0)'
Select ename,
job,
&remun 'Remuneration'
From emp
Order By &remun;
NB Here we have a
more obvious simple text substitution
for &renum.
And the output is :
ENAME JOB Remuneration
SMITH CLERK 9600
JAMES CLERK 11400
ADAMS CLERK 13200
WARD
SALESMAN 15500
MILLER CLERK 15600
MARTIN SALESMAN 16400
TURNER SALESMAN 18000
ALLEN SALESMAN 19500
CLARK MANAGER 29400
ETC.
Reminders
10.1.1 Displaying Current Values
Simply type DEFINE variable_name at the SQL> prompt
E.g.
Typing DEFINE on its own will display the
values of all currently define variables.
Note that Oracle
defines a few standard variables when it is loaded.
10.1.2 The Undefine Command
To
delete the value of a variable simple type
at
the SQL>
prompt
Note that you can
easily re-define a variable by using the DEFINE command again and the new
definition simply overwrites the old definition.
10.2 Substitution Variables
Substitution variables are a simple extension of the variables
discussed above. SQL*Plus allows you to place user variables in your script to indicate where
you want the user to supply values at run-time.
These
substitution variables are identified by preceding the variable name with
either a single or double ampersand
(i.e. & or &&). For example
Select hiredate,
job, ename
From emp
Where empno =
&Employee_Number;
Note the
ampersand &. The variable
Employee_Number has not been previously defined and so
SQL*Plus will prompt the user to provide a value as shown
below
 Enter
value for employee_number: 7788
Enter
value for employee_number: 7788
HIREDATE JOB ENAME
09-DEC-82 ANALYST SCOTT
A SQL
script can have more than one substitution variable.
E.g.
as before we can use
Select empno, ename, sal, job
Where sal < &sal_check
And job = '&job_type'
This
time we shall be prompted for both sal_check and job_type.
 Note the use of the
single quotation marks around job_type. This is needed as job_type needs to be a character string. The output and prompts will look like
Note the use of the
single quotation marks around job_type. This is needed as job_type needs to be a character string. The output and prompts will look like
Enter value for sal_check: 1200
Enter value for job_type: CLERK
Press Return To Continue =>
EMPNO ENAME SAL JOB
7369 SMITH 800 CLERK
7876 ADAMS 1100 CLERK
7900 JAMES 950 CLERK
Note you could also use
 Select empno,
ename, sal, job
Select empno,
ename, sal, job
From emp
Where sal
< &sal_check
 And job = &job_type
and then type in 'CLERK' at the job_type response.
For more flexibility
try
SELECT empno, ename, sal, job
From emp
WHERE sal < &sal_check
AND job = UPPER('&job_type')
This will allow you to
enter something like cleRk at the prompt and all will
work as required.
<aside>
For the ultimate in
flexibility try
Select
&cols
From
&tabs
Where
&conditions
Variations of this technique can be useful in
accessing Oracle's Data Dictionary views and tables.
</aside>
10.2.1 Using Double-Ampersand Substitution Variables
Using
a double ampersand in front of a substitution variable tells SQL*Plus to define that variable for
the duration of the session (e.g. until you log off SQL*Plus). This is very useful when you need to
reference a variable several times in the same script/command file as you don't
wish to prompt for its value each time.
Example
Create
and run the following command file
REM *** The
old and new displays will NOT appear here
REM ***
SQL*Plus only does this for queries
REM ***
This command could be used to remind you
REM *** of
the column definitions
Select &cols
N.B. Once the variable Tab_Name has been preceded by two ampersands subsequent references could use a single or double
ampersand - both will use the previously defined value. Try
running the above file 2 or 3 times in succession - you will only be prompted
for cols after the first execution.
10.2.2 Invoking A Command File Containing Substitution
Variables
Create a command file
called job1.sql containing the following
text
Select empno, ename
From emp
Now execute the query
using START (or @) followed by a parameter E.g.
SQL>start
job1 CLERK
and CLERK is then
substituted for &1. (Something
like parameter passing in Java and VB.NET.)
N.B. Commands containing substitution variables
such as &1, &2 etc. must be
invoked by using START (or @).
Try Start job1 SALESMAN
Exercise 7
Type in 12*sal + NVL(comm, 0) at the prompt that is generated by the query
below and observe what happens.
Select deptno,
&Remuneration What
is this
From emp;
Write a query to display
the number of employees in a department whose department number (deptno) is to
be entered at run-time.
Write a query to display the salary,
location and hiredate of all employees who were hired between two dates which
are to entered at run time.
10.3 The ACCEPT Command
This
command allows you to enter a value to be stored in a variable at run time. This is a more powerful way of creating
substitution variables.
This variable can then be referenced in a SQL statement.
ACCEPT is often used in SQL command files.
The advantages of
using ACCEPT (over substitution variables are:
with ACCEPT there is
a limited form of type checking;
(
N.B. NUMBER CHAR and
DATE only .. see later for definitions)
you can arrange for more
helpful prompts;
responses can be hidden.
The
general syntax is of the form:
ACCEPT
variable [DATA TYPE]
[FORMAT format_spec]
[DEFAULT default_value]
[PROMPT 'prompt text' | NOPROMPT]
[HIDE]
(where
the [ ] brackets imply optionality and [a | b] means a OR b)
The data types
allowed are only the generic NUMBER, CHAR and DATE
Example
Type in the following at the SQL> prompt
ACCEPT testsalary NUMBER PROMPT 'Enter Salary: '
Select *
From emp
Where sal
> &testsalary;
Notes: testsalary is the name
of the variable
NUMBER is its generic data type which will be checked
at input.
SQL*Plus will prompt you with Enter Salary:
You can type in an
appropriate number which will be then
stored in the variable testsalary.
As before you can
check which variables have been defined simply type define at the SQL> prompt or, specifically define testsalary
As before, to cancel
this definition simply type undefine testsalary
Example
ACCEPT
testsalary NUMBER FORMAT 9999.99 PROMPT 'Enter Salary: '
Example
Type
in the following at the SQL> prompt
Accept testjob Char
prompt 'Enter a job title: '
Note
the use of single quotes around &testjob (it is a character string).
ACCEPT testjob Char
Format A6 Prompt 'Enter job title > '
Example
Type
in the following at the SQL> prompt
This will not echo
your input onto the screen. This is achieved
by using the Hide option.
[The rest of Section 10 is for background
reading]
10.4 Bind Variables
Unlike
substitution variables bind variables are 'proper' variables, having both a
data type and a size.
Bind variables
provide a mechanism for returning data from a PL/SQL block back to
SQL*Plus where it can be used for subsequent queries or passed into another
PL/SQL block.
Example
Declare Bind Variables in your SQL*Plus script/command file
variable x number
When used inside a PL/SQL block, use a to preface the variable name
Here follows perhaps
the simplest PL/SQL block.
This does exactly
what you think it does!
execute x := 7729;
/* ----------- Now use in a SQL query ------------ */
Select ename, hiredate
From emp
Where empno = :x;
--- Now use in the
following PL/SQL bloc ----- ----- ---- */
DBMS_OUTPUT.PUT_LINE(:x);
END;
NOTES:
Bind variables are 'lost' at the
length of the SQL*Plus session.
DBMS_OUTPUT.PUT_LINE is a PL/SQL built-in procedure which can be used to display items
(strictly a string of characters/ text) on the screen. See PL/SQL notes.
10.4.1 Declaring a Bind Variable
General syntax
(i.e. variable can be
abbreviated to var)
E.g. var x varchar2(10)
Variable Names
They must start with
a letter and can be up to 30 characters long. The allowable characters include letters, digits, _ , £, $ .
Some
of the 'Allowable Data Types'
NUMBER (but not NUMBER(a, b) or NUMBER(n))
CHAR(n)
VARCHAR2(n)
Checking Current
Variables
Simply type VARIABLE or VARIABLE var_name at the
SQL> prompt.
N.B. You cannot
remove a variable once you've defined it without quitting the session, i.e.
there is no equivalent of undefine
However you can
replace it by simply using the variable
command again: e.g. typing var
x char(2) will
replace any previous definition of x without warning.
10.5 Combining Bind
and Substitution Variables
This
is not straightforward as they were designed to carry out different
tasks.
10.5.1 From
Substitution to Bind
Example
REM ***
This isn't a very useful example but illustrates the
REM ***
many of the basic principles.
REM *** We define to substitution and
two bind variables
ACCEPT sub_x
CHAR FORMAT A10 PROMPT Enter
a name >
DEFINE sub_y
= 3000
VARIABLE
bind_a VARCHAR2(10)
REM *** Now give the bind variables the
values of the
REM *** substitution variables
EXECUTE :bind_a := &sub_x
EXECUTE :bind_b
:= &sub_y
REM *** Now carry out a simple
query using the bind
REM *** variables(see also SQL*Forms
later)
Select ename,
sal, hiredate
From emp
Where ename
= :bind_a
REM *** and to finish off do
some PL/SQL
EXECUTE DBMS_OUTPUT.PUT_LINE(:bind_a)
EXECUTE DBMS_OUTPUT.PUT_LINE(:bind_b)
REM *** Ah well, to really finish off
.. back to SQL*Plus
PRINT bind_a
PRINT bind_b
NOTES
EXECUTE is a way of running a simple PL/SQL command. It provides the BEGIN END structure
for you.
As the substitution variable is
a string the reference to it must be contained in single quotes.
PRINT is a SQL*Plus
command that can be used to display the values of bind variables.
(This
next section contains some tricky material. You can omit it at the first
reading)
10.5.2 From Bind to
Substitution
Taking
a value from a bind variable and placing it into a substitution variable is a
more difficult task. The example below
illustrates the technique. As you will
see it is somewhat convoluted!
Example
SET
VERIFY OFF
DEFINE sub_x = '' --
Define and Initialise the substitution variable
VARIABLE
bind_y VARCHAR2(20) -- Define the bind variable
EXECUTE :bind_y := 'SMITH' --
Initialise the bind variable
COLUMN
temp NEW_VALUE sub_x /* Arrange for the
value of a column called temp to be assigned to sub_x */
SELECT
:bind_y as temp FROM DUAL /* The Select
statement will
return the
value of :bind_y into the
alias temp
and because of the
New_value
option above this will
be
stored in sub_x */
Select
empno, ename From emp
Where
ename = '&sub_x' /* And now to check
to see if SMITH's
details
are selected */
Prompt
Hello &sub_x -- Just to confirm
SET
VERIFY ON
Summary of Bind vs. Substitution
|
Task
|
Bind
Variable
|
Substitution
Variable
|
Comments
|
|
Can be used in the PROMPT command
|
|
|
|
|
Accept input from the user
|
|
|
|
|
Place information into Page Headers and
Footers using TTITLE and BTITLE
|
|
|
|
|
Use in the Where clause of a query
|
|
|
See examples in this section
|
|
Pass values to a PL/SQL function or
procedure
|
|
|
Substitution variables can be used to
pass values in as literals
|
|
Return information back from a PL/SQL
function or procedure
|
|
|
|
10.5.3 Displaying the Contents of a Bind Variable
This
is done using the PRINT command which we have already met. A command such as
PRINT bind_variable
will
display the value of the variable.
You
can also use
PRINT
:bind_variable
if
you wish)
The bind variable is
treated like a database column with the variable name being the default column
heading. Thus you can use the Column (see Chapter 14) commands to tailor the output. E.g.
VAR x NUMBER
EXEC :x := 3445
which will produce
the output
Fancy That
3,445.00
11.0 An Introduction To Report Writing Using SQL*Plus
11.1 Running SQL Queries: A Quick Review
SQL statements will
(usually) be entered in multi-line command and will usually be prepared using a
full screen text editor such as Notepad++.
Blank lines are not allowed in
SQL command files
SQL*Plus does not support blank lines within SQL
statements, even though the Oracle server itself has no trouble with them. For example:
CREATE TABLE dept deptno NUMBER(2), dname VARCHAR2(20) NOT NULL, loc VARCHAR2(20) NOT NULL, constraint pk_dept PRIMARY KEY (deptno)
will not be accepted.
A simple workaround is to use a comment facility such as 'double
hyphen' --
CREATE TABLE dept deptno NUMBER(2), dname VARCHAR2(20) NOT NULL, loc VARCHAR2(20) NOT NULL, constraint pk_dept PRIMARY KEY (deptno)
Sometimes just using
the 'commas' judiciously can have the same effect of 'spacing'.
CREATE TABLE dept deptno NUMBER(2) dname VARCHAR2(20) NOT NULL loc VARCHAR2(20) NOT NULL constraint pk_dept PRIMARY KEY (deptno)
The same applies to
simple SQL queries. The following will
work but simply having a blank line after sal, will not,
Select ename, sal, deptno From emp
Command Terminators
SQL statements can be
terminated by:
a semi-colon (;), which is
usually placed at the end of the final line of the statement;
a forward slash character (/)
but this must be on a separate line on its own and must be the first character in that line;
a blank line - which simply
causes the file to be stored in the SQL buffer ready for execution.
E.g.
INSERT INTO Dept (deptno, dname, loc) VALUES (50, 'TEST', 'TEST')
or
INSERT INTO Dept (deptno, dname, loc) VALUES (51, 'TEST', 'TEST');
11.2 The PROMPT Command
Although there is a PROMPT option within the ACCEPT command the PROMPT command can be used on its own to provide a user with useful
additional guidance about what to enter.
The
following example is indicative of the feedback that can be given to the user. The Prompt
command used on its own is useful to provide a blank line to aid the overall
layout.
PROMPT *** Choose a table name such as Emp or Dept PROMPT ACCEPT tab_name CHAR PROMPT 'Enter Table Name > ' PROMPT PROMPT This is about the *** &&tab_name table *** PROMPT DESCRIBE &&tab_name PROMPT PROMPT * These are the columns of the &&tab_name table * PROMPT UNDEFINE tab_name
Note
that after ac ACCEPT command we can use either & or && and the same
value will be used throughout the session.
11.3 Placing Comments in your
code
As you will recall
there are three ways that this can be done:
using REM[ARK]
using the double hyphen --
using /* .
*/
11.3.1 Points To Note
REMARK commands can only be
used at the start of a line and cannot span more than one line without the use
of the continuation character -
REMARK is a SQL*Plus command
and cannot be used within a SQL 'query'.
The /* . */ delimiters are a
feature of many programming languages and they allow comments to span several
lines.
When you use this feature as follows (i.e. with the delimiters on separate
lines)
/* ----- ----- --------- ----- ----
Now for some comments.
This is an extended comment.
----- ----- --------- ----- ----- */
and these comments are outside a query then the comments are echoed to the
screen.
To suppress these comments you use the
SET DOC OFF command.
The double hyphen commands can
be used anywhere in a script file but cannot span more than one line.
In each case (i.e. REM, /* , --
) leave at least one space before typing your comments.
SQL*Plus does not check for substitution variables embedded
in a comment EXCEPT when those comments are embedded within a query (or a
PL/SQL block).
SQL*Plus does not check SQL
commands. This is done by the database
software.
Example
This is just a demo of some of the above points. Note that using &x here has no effect. REM *** This is just a demonstration of what can be done - *** with REM and the continuation character -- This comment cannot span more than one line REM *** and in the SQL query .. no blank lines! Select ename, sal, deptno -- but usefully comments can go here From emp Where /* Here is a comment explaining the the conditions that follow */
sal < ( Select max(sal) -- Hello &y Don't use & here! From emp Where job = 'CLERK')
11.4 Reports in SQL*Plus
SQL*Plus is a
primitive but very effective reporting tool and it is always available
to an Oracle programmer / consultant whereas the more sophisticated reporting
tools that can be used for generating complex reports, with a full range of
formatting and output capabilities, are not.
Generating a
report, of course, needs a simple methodology. For example: (some of these are optional)
Formulate the query (or
queries);
Format the columns;
Add Headers and Footers;
Add totals, subtotals, averages
etc.;
Format the Page, add page
breaks etc.;
Print/ display the output.
This section covers some of the features
available in SQL*Plus. All the SQL*Plus
commands are available at the SQL>
prompt. Indeed you have already met some
of the features of SQL*Plus. For
example:
Describe
Start or @
Get
Define
Accept
Save
Spool
c (to
invoke the Line Editor)
Rem
You have also installed
a LOGIN.SQL file which controls the SQL environment by using the SQL*Plus set commands (see later).
Recall that SQL*Plus commands are
case
insensitive single
line commands (but you can extend them over more than one line if you wish)
and
do not have
to end with a semi-colon (
In
most cases the best way to use SQL*Plus
commands is to include them in SQL*Plus
command file.
Parameters
that you set up using SQL*Plus
commands stay in force until you log off from SQL or change them or clear
them.
Example (Read
the whole page first before executing the file
Prepare the following
file using your usual text editor. Call
it plus1.sql It provides some simple illustrations of the Column and Heading
commands. (Note that the text following
the Heading command is case sensitive.)
In this example the SQL*Plus
commands have been typed in bold.
Remark *** S a l e s R e p o r t ** **
Column ename Heading Salespeople Format A11
Column sal Heading Salary Format
99,999
Column comm Heading Commission Format
99,990
Remark
** ** ** ** ** ** *****
Select ename, sal , comm
From emp
Where job = 'SALESMAN'
Clear
Columns
Test
the above SQL command file by using START
plus1. It is essential that you get this
to work. Once you are comfortable with
what you think it is doing - experiment. More details of the Column, Heading and
Format commands are given below.
11.5 Column Commands
These establish
display options for a column. E.g.
Column Ename Format A11 Heading Salespeople
Format A11 refers to the data type of column Tax (A for alphanumeric in
this case) and sets the width for display to 11 characters. See below for more details on the options
available.
Heading 'Salespeople' effectively
replaces the default heading (which would be Ename) with Salespeople.
If you wish the heading to contain a space the place the heading text in single
quotes. E.g. 'Sales Staff'. In fact it is good practice to always include
them.
The options that can follow Column,
such as Format and Heading
, can appear in any order.
To determine the current
settings type column column_name (e.f.
column ename) or column column_alias. To
view all the options simply type column.
To clear a column setting simply
type Column column_name Clear.
To reset all the columns to their default settings use Clear Columns.
Resetting all columns is good
practice and you are encouraged to do so by including this command in your
command files. See the example above.
To have a heading covering more
than one line use | as follows
Column sal Heading Monthly|Salary
11.6 The Format Options
An alphanumeric n characters wide
for numeric fields e.g. format 999999 for a field 6 digits
wide
use to enforce leading
zeroes e.g. format 0999 (or format 0 for one digit) to ensure
that zeroes are printed rather than blanks when the value to be displayed
evaluates to zero
use to insert a decimal point e.g.
format 9999.99
use to insert a comma e.g. format 999,999
EEEE use to invoke scientific
notation e.g. format 99.99EEEE
B use to display zero
values as blanks e.g. format B999
11.6.1
Errors
If
after execution a column displays ##### then it probably implies that the
(formatting ) width is too small for the data.
A display of a % means the wrong data type has been used.
11.7 Some Options Available in the Column Command.
Some of the other COLUMN options
are given below. Experiment
|
Wra[pped]
|
If the contents of a column exceeds the
specified width then the additional information will be wrapped round to the
next line.
|
|
Wor[d_Wrapped]
|
Moves an entire word to the next line
rather than split it over two lines. A
word will not be split unless it is bigger than the column width.
|
|
Jus[tify Right]
|
Column headings
are justified as specified. Defaults
for headings are Left for Char/Date and Right for Number. You can also justify Left and Center (Note
spelling)
|
|
Null 'text'
|
Sets any NULLS in the column to the
specified string. Very useful in
making the display of null values meaningful.
|
|
Like source_column
|
Causes the column to be defined with the
same format as another column.
|
|
Newline
|
Causes SQL*Plus to wrap to a new line
before the column is printed
|
|
Clear
|
Erases all formatting for the column named.
|
11.8 A Detailed
Example Using SQL*Plus Commands
Create the following
text file and save it in your Scripts sub directory as PLUS2.SQL. N.B A .sql file can contain several
independent SQL scripts. Each one must
finish with a semi-colon or (and this
is safer) have a / as the only character on the following line.
Set
Linesize 100
Column Deptno Format 099 Heading Dept
Column Job Format A9 Heading ' Job'
Justify Right
Rem
**
The quotes ' ' are only needed for a
Heading if Rem ** there are spaces
in the text.
Column Sal Format L99,999.00
Column Empno Format 9999 Heading Empl|No.

 Column Comm Format L99,990.99 -
Heading Y-T-D|Commission -
Null 'No Comm'
Rem
**
Note use of the continuation character - (hyphen)
Rem
**
in the Column specification given above
Rem
**
There must be one space before the hyphen
/*
Note the use of the
Column Aliases Totinc.
If you use a column alias
in the SQL query (see below) then this
alias must be used in the Column output specification.
 Column Totinc Format L999,999.99 -
Heading 'Total Income'
Select Deptno, --
Comment explaining Deptno
Job,
Empno,
Sal,
Comm,
Sal * 12 + Nvl(Comm, 0) Totinc
From Emp
Clear
Columns
Set
Linesize 78
TEST THIS CAREFULLY.
CHECK THE OUTPUT CAREFULLY
EXPERIMENT
See overleaf.
Empl Y-T-D
Dept Job No. SAL Commission Total Income
010 PRESIDENT 7839 £5,000.00 No Comm £60,000.00
030 MANAGER 7698 £2,850.00 No Comm £34,200.00
010 MANAGER 7782 £2,450.00 No Comm £29,400.00
020 MANAGER 7566 £2,975.00 No Comm £35,700.00
020 ANALYST 7902 £3,000.00 No Comm £36,000.00
020 CLERK 7369 £800.00 No Comm £9,600.00
030 SALESMAN 7499 £1,600.00 £300.00 £19,500.00
030 SALESMAN 7521 £1,250.00 £500.00 £15,500.00
030 SALESMAN 7654 £1,250.00 £1,400.00 £16,400.00
020 ANALYST 7788 £3,000.00 No Comm £36,000.00
030 SALESMAN 7844 £1,500.00 £0.00 £18,000.00
020 CLERK 7876 £1,100.00 No Comm £13,200.00
030 CLERK 7900 £950.00 No Comm £11,400.00
010 CLERK 7934 £1,300.00 No Comm £15,600.00
Notes
1. The output in the Y-T-D/Commission column is a little ragged. A simple way to adjust this is to edit the
corresponding Column
format specification so that the text and the numbers
line up. Amend PLUS2.SQL by
changing the Comm specification to
Column Comm Format 99,990.99 -
Heading Y-T-D|Commission -
Null
' No Comm'
How many spaces do
you need to add to the string in the Null option? Experiment. Note that you have to use quotes
to ensure that the spaces are printed.
The use of the format mask L99,999.99 has
increased the amount of space needed for the display. This annoying feature can be side-stepped by
using
in the main query and
removing the column formatting options.
TEST the above command file
THOROUGHLY . then test it again, then again - and experiment!!
N.B. The SELECT clause can contain
column names, column aliases, columns with a table prefix, expressions and literal strings.
These
can determine the column name
specified in the SQL*Plus COLUMN command. So, for example :
if you use sal, emp.sal or e.sal in the select command then
use Column sal in the SQL*Plus command file.
if you use a column alias (e.g.
select
sal*12 annsal)
then you must use this alias in the corresponding Column command in the SQL*Plus
command file i.e. use Column annsal etc.
<Aside1>
The use of the 'L' in L99,999.00 will invoke
the £ sign in the display (as shown above) as long as you have executed the
command
alter session set NLS_CURRENCY = '£';
Note, you have already done so if you have activated login.sql correctly.
</Aside1>
<Aside2>
If
you use Empno||'-'||Ename in the select command then use
Column
Empno||'-'||Ename in the Sql*Plus File.
</Aside2>
Exercise
Check on the effect
of the SQL*Plus command CLEAR SCREEN (or
clear screen - the command is case insensitive).
(Typing it at the
SQL> prompt may give you a hint!)
11.9 Set Commands
They assign a value to a system variable (see below).
They can be used in a LOGIN.SQL file
to make certain values the defaults for a session (check your own LOGIN.SQL file
sometime
To determine the current
default values use the Show
command at the SQL>
prompt (e.g. Show Pagesize, Show All
They can also be placed in your
SQL*Plus command files. See examples
given below.
Some of
the more useful possibilities are given below. Use HELP to get a full list of options together with brief explanations. Feel free to experiment.
|
Set Echo Off
|
This suppresses the display of commands as
they are executed. Set Echo On will return you to the
default mode
|
|
Set Feedback n
|
SQL*Plus will display the number records
selected by a query when at least n are selected. Set
Feedback Off cancels this option. Set Feedback On sets n to 1
|
|
Set Linesize n
|
Sets the number of characters that will be
displayed on a line before beginning a new line. The default is 80. There is sometimes a fair amount of 'trial
and error' needed if you wish to get underlining and centering
working in harmony.
|
|
Set Newpage n
|
Sets the number of blank lines to be
printed between the bottom title of each page and the top title of the next
page. See later for an explanation of
Titles. If you use n = 0 then this
acts as a 'form feed' and the subsequent output will be printed on a new
page.
|
|
Set Numwidth n
|
Sets the default width for displaying
number values. The default is 10.
|
|
Set Pagesize n
|
Sets the number of lines per page (a screen
page or a printer page). For A4 paper
try a NEWPAGE value of 6 and n = 57. The default is 24. A pagesize
of between 20 and 24 is usually recommended for screen display. Your login.sql in fact sets n to 20.
|
|
Set Pause 'text'
|
Before each new page is printed SQL will
prompt you with a message text. For this to work you also need to have to
have issued the command Set Pause On. The use of Set Pause Off should be obvious(?)
|
|
Set Termout Off|On
|
Controls the display of output generated by
commands executed from a SQL command file. OFF suppresses the display so that you can spool output from a command
file without seeing the output on the screen. Set Termout ON displays the output.
Set Termout OFF does not affect output from
commands entered interactively.
|
|
Set Verify Off|On
|
Controls whether SQL*Plus lists the text of
a command before and after SQL*Plus replaces substitution variables with
values. Set Verify ON
lists the text and Set Verify OFF suppresses the listing. This is useful for checking that parameter
substitutions has worked correctly.
|
|
Set Prompt Off|On
|
This can be used to provide a screen
display as a command file executes. Check how this is used in the login.sql file. ('Hit <RETURN> to
continue . ')
|
Exercise 8
Use
the supplied documentation 'SQLPlus -
User Guide and Reference.pdf' to:
determine what the commands in the supplied login.sql file
actually do;
investigate the semantics
for the following options for the Set command options
Heading, Wrap,
Numformat, Sqlprompt, Sqlprefix, Autocommit.
11.10 The TTITLE and BTITLE Commands
These are used to
give titles to the reports; they are similar in one sense to the headers and
footers you have in Word Processing files.
E.G.
TTITLE 'Weekly Report'
BTITLE 'Summary - over the page'
Using the above
format then, by default, the Ttitle command:
displays the current date in
the top left hand corner of each page;
displays the page number in the
top right hand corner of each page;
centres the text (e.g. 'Weekly
Report') on the next line down.
Note: if you tailor
the TTITLE command in any way then you
do not get any automatic page
number, date and centring. But see below
.
The BTITLE command prints the text centred at the bottom of each page.
For both commands the
'|' character can be used to split text over more than one line. Examples will follow.
Typing TTITLE or BTITLE at the SQL> prompt simply displays their current values.
Exercise 9
Make the following
additions to your plus2.sql file and then test it.
REM ***** To test the TITLE commands ****
Ttitle 'Company Report|Produced By The Personnel Department'
Btitle 'CONFIDENTIAL'
Ttitle off
Btitle off
Clear columns
Rem *** Title and Column definitions now reset ****
11.11 Tailored
Titles And Footnotes
The TTITLE and BTITLE commands can include a
number of clauses enabling the appearance of the title to be specified in more
detail
(Note : items in [ ]
brackets are optional entries whilst items separated by a | are alternatives)
Some of the clauses that could appear in printspec are :-
LEFT
RIGHT,
CENTER are used to align the
text (Note spelling of CENTER)
COL n which starts printing at
position n of the current line
SKIP n skips to the start of a new line n times. If n is omitted then it is assumed to be
0.
FORMAT CHAR specifies the format model of
the data items that are to follow it. It
is similar to the Format command used with Column
Some of the standard
variables that can be used are:
SQL.PNO used to generate current
page number;
SQL.USER used to generate current user
name.
Example
Try out the
following. Save as plus3.sql
TTITLE LEFT FORMAT 099 'Page :' SQL.PNO -
RIGHT 'Produced by : Accounting 'SKIP 2 -
RIGHT '----- ----- ----------------' SKIP 2
REMARK Note use of the
continuation character -
BTITLE CENTER 'End of
Report' SKIP -
CENTER '----- ----- -----'
Select Ename, Job, Sal, Comm
From Emp
Where Comm is not null;
TTITLE OFF
BTITLE OFF
REM Note use of Ttitle Off
and Btitle Off: this is good practice.
11.12 Writing A
Basic Report: Outline Steps
Construct and test the select
statements using your usual editor. Save
and Test.
Add your formatting commands
(Column, Heading, Ttitle etc.)
Add totals, subtotals etc. (see
later)
Add comments/remarks to help in
documentation/maintenance. Note the use
of REMARK, /* ..*/ and -- .
Add any page formatting
commands you need
Add the Clear commands (see
later for more examples).
Print/Display
There is no definitive style for the layout of SQL and SQL*Plus
commands. But,
whatever style you choose be consistent
The use of the TAB
key will often enhance the layout.
Some authors prefer
to use lower case for all commands whilst others use a mix of lower case, upper
case and initial capital letters.
When you decide on a
strategy then you may wish to distinguish between commands (e.g. SELECT),
functions (e.g. To_char), tables (e.g. Emp) and column names (e.g. ename).
Consider
SELECT Initcap(ename) A,
sal*12 +
Nvl(Comm,0) B,
To_char(hiredate,'MM,YY') C,
mgr D
FROM Emp
ORDER BY ename;
This style is NOT obligatory
and will not be enforced in these notes either.
Exercise 10
Create and test the
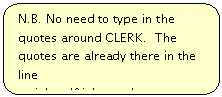
following. Call it plus4.sql. Check and print out the output.
Set echo off
Remark *** Set up the SQL*Plus environment ***
Set Pagesize 24
Set Feedback Off
Remark *** Format the Columns ***
Column a Format A10 Heading Department
Column b Format A9 Heading Job
Column c Format 9999 Heading Emp|No.
Column d Format A8 Heading Name
Column e Format A5 Heading Hire|Date
Column f Format B99,999.99 Heading Monthly|Salary
Column g Format 99,990.99 Heading Annual|Comm
Column h Format 999,999.99 Heading Total
Remark *** Setting up Titles ***
Ttitle 'E M P L O Y E E R E P O R
T'
Btitle 'Confidential'
Remark *** The Query ***
SELECT dname a, -- select the department name
job b, --
and the job
empno c, --
etc. etc. Don't over do this!!
ename d,
To_char(hiredate, 'MM/YY') e,
sal f,
comm g,
sal * 12 + Nvl(comm, 0) h -- use Nvl because..
FROM Emp p, Dept d
WHERE p.deptno = d.deptno --
comments
ORDER BY dname, job
Remark *** Reset the
environment ***
Clear columns
Ttitle Off
Btitle Off
Set Feedback on
Set Pagesize 20
Set Echo on
The
output is given on the next page.
Tue Sep
30
page 1
E M P L O Y E E R E P O R T
Emp Hire Monthly Annual
Department
Job No. Name Date Salary Comm Total
ACCOUNTING
CLERK 7934 MILLER 01/82 1,300.00 15,600.00
ACCOUNTING
MANAGER 7782 CLARK 06/81 2,450.00 29,400.00
ACCOUNTING
PRESIDENT 7839 KING 11/81 5,000.00 60,000.00
RESEARCH ANALYST 7902 FORD 12/81 3,000.00 36,000.00
RESEARCH ANALYST 7788 SCOTT 12/82 3,000.00 36,000.00
RESEARCH CLERK 7369 SMITH 12/80 800.00 9,600.00
RESEARCH CLERK 7876 ADAMS 01/83 1,100.00 13,200.00
RESEARCH MANAGER 7566 JONES 04/81 2,975.00 35,700.00
SALES CLERK 7900 JAMES 12/81 950.00 11,400.00
SALES MANAGER 7698 BLAKE 05/81 2,850.00 34,200.00
SALES SALESMAN 7499 ALLEN 02/81 1,600.00 300.00 19,500.00
SALES SALESMAN 7521 WARD 02/81 1,250.00 500.00 15,500.00
SALES SALESMAN 7844 TURNER 09/81 1,500.00 0.00 18,000.00
SALES SALESMAN 7654 MARTIN 09/81 1,250.00 1,400.00 16,400.00
Confidential
11.13 The Break
Command
The rows of a report
may be broken up into sections by using the BREAK
command. This command can also (by
default) suppress the display of duplicate values in the column used in the
Break command.
N.B. You must have deptno as one of the
selected columns for the 'breaking' effect to work. If you don't wish to see deptno
displayed when the command is executed then add the command
Column deptno noprint
before the query.
Also add, say, Skip 1 at the end of the
Break command - else you will not see any effect if you do not display
deptno
|
|
Example
Try this and observe. Save as plus5.sql
 Break On deptno
SELECT deptno, job, empno, sal
FROM Emp
ORDER BY deptno
The output is of the
form . (see next page)
DEPTNO JOB EMPNO SAL
10 PRESIDENT 7839 5000
MANAGER 7782 2450
CLERK 7934 1300
20 MANAGER 7566 2975
CLERK 7369 800
ANALYST 7902 3000
ANALYST 7788 3000
CLERK 7876 1100
30 MANAGER 7698 2850
SALESMAN 7499 1600
SALESMAN 7521 1250
CLERK 7900 950
SALESMAN 7844 1500
SALESMAN 7654 1250
14 rows selected.
Since a break will
occur each time the column value changes you must use the
Order By clause otherwise the report
will be split into meaningless sections.
N.B.
There can only be ONE Break command active at any one time.
Thus if you require
multiple breaks then they all have to be specified in the same Break command.
You should always
list the break columns in order of importance, i.e. major breaks first.
Amend plus5.sql as shown below and note
the output
Select deptno, job, empno, sal
From Emp
Order By deptno, job, sal
N.B.
Note the sequencing of the columns in the Break command and the Order
by clause must match.
The general syntax of
the Break command allows for an action
to be specified after each On
column_name option. The actions could be one
of:
Skip Page effectively issues a
form-feed when the value in a column changes
Skip n skips n lines when
a value changes
Duplicate duplicates values - the
default is Noduplicate
Try the following amendments to plus5.sql
Break On deptno skip page -
On
job skip 1 -
On sal skip 1
Select deptno, job, empno, sal
Order By deptno, job, sal
The output from this
command file is given below. Check and
note what is happening. It may not be
that obvious. Try it again without the skip
commands.
DEPTNO JOB EMPNO SAL
-------- --------- --------- ---------
10 CLERK 7934 1300
MANAGER 7782 2450
PRESIDENT 7839 5000
DEPTNO JOB EMPNO SAL
-------- --------- --------- ---------
20 ANALYST 7788 3000
7902
CLERK 7369 800
7876 1100
MANAGER 7566 2975
DEPTNO JOB EMPNO SAL
-------- --------- --------- ---------
30 CLERK 7900 950
MANAGER 7698 2850
SALESMAN 7521 1250
7654
7844 1500
7499 1600
14 rows selected.
N.B.
To remove breaks use the Clear
Breaks command.
To display the current Break settings use the Break
command
If column aliases have been used in
the Select clause then the Break command MUST use these
aliases.
e.g.
Break On
d On j On sal
Select deptno
d, job j, empno, sal
From Emp
Order By
deptno, job, sal;
Clear Breaks
NB: if you use table aliases in your query then any associated column
command must also use that alias.
e.g. column e.deptno heading, Etc.
Select e.deptno,
From Emp
e, Dept d ,
BUT any associated Break command must only use deptno rather than e.deptno.
e.g. column e.deptno format
Break On deptno
Select e.deptno,
.
From Emp
e, Dept d , .
Hint: play safe and use column
aliases in the Select clause and use these aliases for all associated Column
and Break commands - then the 'confusion' is removed!
11.14 The Compute
Command
The Compute command instructs SQL*Plus to perform calculations. These are summary calculations (sums, averages etc.) and are controlled
by the Break command.
The general structure of the Compute
command is (note her that | means 'or')
Compute clauses Of Columns|Expressions
On Break_columns|Report|Row
The clauses that can be used include
|
Clause
|
Computes
|
Applies to Data Types
|
|
AVG
|
Average value of non null values
|
Number
|
|
COUNT
|
Count of non null values
|
all
|
|
MAX
|
Maximum Value
|
Number, Char, Varchar2
|
|
MIN
|
Minimum Value
|
Number, Char, Varchar2
|
|
NUM
|
Count of rows
|
all
|
|
STD
|
Standard Deviation
|
Number
|
|
SUM
|
Sum of non-null values
|
Number
|
Unlike the Break command which only
appears once per command file there may be many Compute commands although
it is often easier to specify all the computes required in one command. E.g.
Compute Sum Avg Of Sal Comm On deptno Report
(i.e. you are 'summarising Sal and Comm based
on groups identified by different values of deptno (and on the complete
report)).
This will find the sum and average of the
values stored in the Sal and Comm columns printing them out for each department (as long as there was a Break on Deptno active) and for the 'complete
selection' (as long as there is a Break
On Report active).
[Aside: What would happen if we replace Comm in the above
command with Nvl(Comm,
0)? Try it.]
N.B.
To clear Compute settings simply type Clear Computes
To display current settings type Compute
As an example, consider the following SQL*Plus
command file.
set pagesize 30
column sal format L99,999
break on deptno skip 1 on report
compute sum of sal on deptno
Select deptno, job, empno, sal
From emp
clear columns
clear breaks
which has the
output given overleaf. Note the use of
the 'L' as a formatting character and then check your login.sql file to check why this has worked.
Output overleaf
DEPTNO JOB EMPNO SAL
10 PRESIDENT 7839 £5,000
MANAGER 7782 £2,450
CLERK 7934 £1,300
sum £8,750
20 MANAGER 7566 £2,975
CLERK 7369 £800
ANALYST 7902 £3,000
ANALYST 7788 £3,000
CLERK 7876 £1,100
----- ----- -------
sum £10,875
30 MANAGER 7698 £2,850
SALESMAN 7499 £1,600
SALESMAN 7521 £1,250
CLERK 7900 £950
SALESMAN 7844 £1,500
SALESMAN 7654 £1,250
----- ----- -------
sum £9,400
14 rows selected.
Enter the above
command and experiment. What if we chose
not to display the deptno column? Find
out!
Exercise 11
Amend plus2.sql to read as
follows and save it as plus6.sql.
Set Echo Off
Set Pagesize 24
Set Feedback Off
Column Deptno Format
099 Heading ' Dept'
/* Why the spaces in
front of Dept ?
See Label commands below */
Column Job Format
A9 Heading ' Job' Justify Right
Column Empno Format
9999 Heading Emp|No.
Column Sal Format
99,999.99 Heading Monthly|Salary
Column Comm Format
99,990.99 Heading Y-T-D|Commission Null ' No Comm'
Column Totinc Format 999,999.99 Heading 'Total Income'
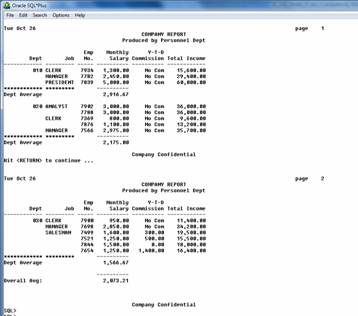
Ttitle 'COMPANY REPORT|Produced by Personnel Dept'
Btitle 'Company Confidential'
Break On Deptno Skip
1 On Job On Report
And
now for a variation on a theme - the LABEL option
Compute Sum Label 'Dept
Total: ' Of Sal On Deptno
Compute Avg Label
'Dept Average: ' Of Sal On Deptno
Compute Sum Label 'Overall
Tot: ' Of Sal On Report
Compute Avg Label
'Overall Avg: ' Of Sal On Report
Define CommN = 'Nvl(Comm,
0)'
SELECT deptno,
job,
empno,
sal,
comm,
sal*12 + &CommN Totinc
FROM Emp
ORDER BY Deptno, Job
Clear Columns
Clear Breaks
Ttitle Off
Btitle Off
Set Pagesize 20
Set Feedback On
Set Echo On
Exercise 12
Reminder:
If column aliases have been used in the Select clause then the Column, Break
and Compute commands must also use these aliases.
(i)
Amend PLUS4.SQL to produce the following output. Save as Plus4a.sql
(ii)
Adjust your solution to cope
with the display of a £ sign in the appropriate places
(iii)
Now amend your solution to only
display the details corresponding to a particular department. The department number is to be entered at run
time by using the Accept command.
11.15 Master Detail
Formatting :The 'New_Value' Option
Suppose we wish
to create a report that displays a manager's numbers at the top of a page and
have the employees reporting to that manager on the same page - and that is
repeated for each manager (i.e. someone who has staff reporting to them).
This is an example of what is termed a Master Detail
report.
Another example
would be to have a department name at the head of each page followed by a list
of employees, and their details, which work for that department.
Surprisingly
there is no elegant way of achieving
this in SQL*Plus, however it can be done using user variables and the NEW_VALUE
option of the column command.
The usual
format is
Column_name
must be a legal column name of one of the tables involved in the subsequent
query and user_variable has the same
properties as if it was created using define, accept or & except that it is not referenced by invoking &user_variable and all we need to do is use user_variable
In this case we
could use:
The Noprint option suppresses the printing of the Mgr column in any Select statement. This doesn't
matter as we are contriving to have the manager's number printed in the page
title.
However, in this case the value of u_Mgr is updated every time the query retrieves a new row of data from
the database.
Enter the following and observe. Save it as nv1.sql.
Column Mgr New_Value u_Mgr Noprint
Ttitle Left 'Manager: ' u_Mgr Skip
2
Break On Mgr Skip Page
Select Mgr, Ename, Sal, Deptno
From Emp
Where Mgr In (7698, 7839)
Order By Mgr
The output should look something like this
Manager
: 7698
ENAME SAL DEPTNO
ALLEN 1600 30
WARD 1250 30
TURNER 1500 30
MARTIN 1250 30
JAMES 950 30
Press
Return To Continue =>
Manager
: 7839
ENAME SAL DEPTNO
JONES 2975 20
BLAKE 2850 30
CLARK 2450 10
8
rows selected.
Note that the Mgr column has not been displayed.
Of course we can improve the layout using further features of Ttitle
and Btitle
Exercise 13
Construct a command file that will display
the name of the department at the head of each page followed by the name,
salary and hiredate for each employee in each department.
Mimic the following layout as closely as possible.
Department
Summary Report
----- ----- ---------------
DEPARTMENT : ACCOUNTING Page 1
ENAME SAL HIREDATE
---------- --------- ---------
CLARK 2450 09-JUN-81
KING 5000 17-NOV-81
MILLER 1300 23-JAN-82
End Of Report
Press Return To Continue =>
Department Summary Report
----- ----- ---------------
DEPARTMENT : RESEARCH Page 2
ENAME SAL HIREDATE
---------- --------- ---------
SMITH 800 17-DEC-80
ADAMS 1100 12-JAN-83
FORD 3000 03-DEC-81
SCOTT 3000 09-DEC-82
JONES 2975 02-APR-81
End Of Report
Press Return To Continue =>
Department Summary Report
----- ----- ---------------
DEPARTMENT : SALES Page 3
ENAME SAL HIREDATE
---------- --------- ---------
ALLEN 1600 20-FEB-81
BLAKE 2850 01-MAY-81
MARTIN 1250 28-SEP-81
JAMES 950 03-DEC-81
TURNER 1500 08-SEP-81
WARD 1250 22-FEB-81
End Of Report
14 rows selected.
11.16 Dates in Headers
It is very
common practice to put the date in the header of a report. It is so obvious and so common it is quite
surprising that it isn't simpler to do!
Again we have
to rely on new_value
Create the
following command file, calling in date1.sql and experiment. Suggested improvements will follow.
Printdate is the variable storing the value of Sysdate
Column Sysdate New_Value Printdate
And now we update Sysdate by
'fetching' it ..
Select Sysdate From Dual
Ttitle Left ' ~~~ HERE IS A REPORT ~~~ ' -
Right
'Date: ' Printdate Skip 2
Select Ename,
Hiredate
From Emp
Where Deptno
= 30
Ttitle Off
Clear Columns
Select Sysdate from dual
command.
Can we suppress this? Read on!
Can we output the date in a different
format? Of course. Amend date1.sql as suggested below and save it as date2.sql.
(see
overleaf)
Set Echo Off -- Why?
Set Linesize 50 -- Why?
Set Termout Off -- Why?
Set Pause Off -- Why?
/* Today is an alias used in the Select clause of the
query used to, effectively retrieve sysdate.
Column Today New_Value Printdate
REM *** continued . .
Select To_Char(Sysdate, 'fmMonth DD, YYYY') Today
From Dual
Set Pause On
Set Termout On
Ttitle Left 'Date:
' Printdate -
Right Format 09 'Page:' sql.pno Skip 2 -
Center 'A report with reformatted date' Skip 1 -
Center '----- ----- --------- ----- ------' Skip 2
Select Ename,
Hiredate
From Emp
Where Deptno = 30
Ttitle Off
Clear Columns
Set Echo On
And the output will look something like
Date: September 15, 1999 Page: 01
A report with reformatted date
----- ----- --------- ----- ------
ENAME HIREDATE
ALLEN 20-FEB-81
WARD 22-FEB-81
MARTIN 28-SEP-81
BLAKE 01-MAY-81
TURNER 08-SEP-81
JAMES 03-DEC-81
11.17 Other uses of New_Value
Enter the command file given below and
observe. What is happening?
Parameter Passing form one query to
another? How else would you achieve the
same effect without using new_value
Set Echo Off
Set Verify Off -- Why?
Set Pause Off
Column j Format A11 Heading 'Job With|Max Avg Sal'
Set Termout Off
Select max(avg(sal))
max_avg_sal
From emp
Where job != 'PRESIDENT'
Set Termout On
from emp
group by job
having avg(sal) = &max
Clear Columns
Set Verify On
Set Pause On
Set Echo On
and the output
looks like
Job
With
Max
Avg Sal
ANALYST
11.18 Typical
Structure Of A SQL*Plus Command File
Rem *** Set up the environment ***
Set .
Col
Ttitle
Btitle
Break
Compute
Remark *** The query or queries ***
Select
Remark *** Re-set the environment ***
Clear Computes
Clear Breaks
BTitle Off
Ttitle Off
Clear Columns
11.19 Abbreviations
Most SQL*Plus commands, unlike SQL
commands, can be abbreviated. We have
deliberately not used any abbreviations in the above notes. In any case the abbreviations do not
always aid clarity.
Some examples are given below.
|
Command
|
Abbreviation
|
|
Break
|
Bre
|
|
Column
|
Col
|
|
Compute
|
Comp
|
|
Format
|
For
|
|
Heading
|
Hea
|
|
Ttitle
|
Tti
|
11.20 User
Interaction In SQL*Plus
(A brief re-visit)
You can bypass the prompts for values
associated with substitution variables by passing values to parameters in a
command file.
Example 1
Create the following command file. Call it param.sql
Select *
From Emp
Where Job = '&1'
And Sal = &2
Now run it by typing
Start param CLERK 800
at the SQL>
prompt.
CLERK (note the
capitals) and 800 are the parameters that will be substituted for &1 and
&2 respectively.
Of course you should
also use the commands Prompt
and Accept to communicate with the
user. See previous notes.
Example 2
Set up the following command file, call
it p1.sql and test it.
N.B. Note also how the variable used in the Accept
command can also be used in the Ttitle command. It can be used without the preceding &.
Prompt Enter a Title of
up to 30 characters
Ttitle Center &Mytitle Skip 2
Select * From dept;
Exercise 14
Find out about
the commands REPHEADER
and amend one of the reports you have already written to include the use of
these commands.
11.21 Branching in SQL*Plus
SQL*Plus has no IF statement which can be
rather annoying for a scripting language. There are some approaches to overcome this oversight (or, of course, use
PL/SQL).
Example 1
Create a command file called update_sal.sql containing the
following text.
ACCEPT s_update_confirm
CHAR
PROMPT 'Do you wish to update (Y/N)? > '
UPDATE Emp
Set sal = sal + 100
Where Upper('&s_update_confirm') = 'Y';
It provides a primitive but reasonably
effective 'do this if . ' option
Example 2
We can improve matters a shade. Amend update_sal.sql as follows.
ACCEPT s_update_confirm
CHAR PROMPT 'Do you wish to update (Y/N)? > '
SET HEADING OFF
SET PAGESIZE 0
SET FEEDBACK OFF
SET VERIFY OFF
Select 'Please Type in Y
or N'
From Dual
Where Upper('&s_update_confirm') Not In ('Y', 'N')
Or '&s_update_confirm' Is Null
SET FEEDBACK ON
SET PAGESIZE 1
SET HEADING ON
UPDATE Emp
Set sal = sal + 100
Where Upper('&s_update_confirm') = 'Y'
SET VERIFY ON
If you run this with incorrect input you
will see something like
Do you wish to update (Y/N)? > b
Please Type in Y or N
0 rows updated.
Simple Branching using SQL
Example 1
Use the following text to create a file
called (say) br1.sql.
Then invoke @br1 (or start br1) at the SQL
prompt.
This
only works properly if you have already prepared the files report1.sql,
report2.sql and report3.sql
To
test set report1.sql to contain
Select
* from emp;
Set
report2.sql to contain
Select
* from dept;
Set
report3.sql to contain
Select
* from salgrade;
PROMPT
PROMPT 1 - Report One
PROMPT 2 - Report Two
PROMPT 2 - Report Three
PROMPT
ACCEPT choice char Prompt 'Enter your choice (1,2,3) > '
@report&choice
Example 2
Use the following text to create a file
called (say) br2.sql.
Then invoke @br2 (or start br2) at the SQL
prompt.
SET DOC OFF
CLEAR SCREEN
The function decode is covered in the next
section
It performs the same functionality as a
'case' statement.
This allows you to trap an error in the
input.
Prepare the file Error.sql first to include
PROMPT Incorrect Input
DEFINE padding = ''
PROMPT
PROMPT &padding 2 -
Report Two
PROMPT &padding 3 -
Report Three
PROMPT
ACCEPT choice CHAR Prompt
' Enter your choice (1,2,3) > '
SET TERMOUT OFF
SET PAUSE OFF
COLUMN entered_value
NEW_VALUE Run_this
Select Decode('&choice',
'1', 'Report1.sql',
'2', 'Report2.sql',
'3', 'Report3.sql',
'Error.sql')
entered_value
From Dual
SET TERMOUT ON
SET PAUSE ON
@&Run_this
11.23 Looping In SQL*Plus
Looping is not really supported in SQL*Plus
so the advice is to use PL/SQL ,
except in the special case when you want
user interaction.
Example
Create a file called finished.sql containing only the line
Now create the following file and call it loopdemo.sql
SET DOC OFF
SET VERIFY OFF
Note that &1 in the
first select clause will prompt you for the name of a table.
You could pass it a value by using a call such as
@loopdemo EMP
Select * from &1 -- input parameter
PROMPT
ACCEPT x CHAR PROMPT 'Next
Table? >'
COL alias
NOPRINT NEW_VALUE next_table
SET TERM OFF
SET PAUSE OFF
select decode('&x','','finished.sql',
 'loopdemo.sql '||'&x') alias
from dual
SET TERM ON
SET PAUSE ON
/* and now run the
command file 'chosen' by the decode command */
@&next_table
11.24 Odds and Ends
SQL*Plus has a vast array of additional facilities. You are encouraged to tio use the SQL*Plus
Reference file or countless websites.
E.g.
what does the following achieve?
12.0
The Decode and Case Functions
Decode and Case are powerful SQL functions that allow a measure of conditional processing to be carried out very
much like the traditional
if . then . else facilities in a high
level programming language
12.1 Decode
DECODE ( column or expression,
search1, result1,
search2, result2,
etc. etc.,
default)
The
column (or expression) is compared to each search value
in turn and returns the corresponding result
if there is a match
If no match is found, the DECODE function returns the default
value.
If the default value is omitted then NULL is returned for unmatched
values (never do this!)
Note
search must be of the same data type
as column or expression
and all the result options must be of the same data type (but not necessarily of the same
data type as search
12.2 Examples of the use of Decode
Work through all
of these carefully.

Column
A search value
Result
|
|
Test
each one in turn and satisfy yourselves that the output is what you would
expect.
 Select ename, job, sal Old_salary,
Decode(job, 'ANALYST', sal*1.1,
'CLERK', sal*1.2,
 'MANAGER', sal*0.8,
sal) New_salary
 From emp;
Default value
OUTPUT
ENAME JOB OLD_SALARY NEW_SALARY
KING PRESIDENT 5000 5000
BLAKE MANAGER 2850 2280
CLARK MANAGER 2450 1960
JONES MANAGER 2975 2380
FORD ANALYST 3000 3300
SMITH CLERK 800 960
ALLEN
SALESMAN 1600 1600
WARD SALESMAN 1250 1250
MARTIN SALESMAN 1250 1250
SCOTT ANALYST 3000 3300
TURNER SALESMAN 1500 1500
ADAMS CLERK 1100 1320
JAMES CLERK 950 1140
MILLER CLERK 1300 1560
Select ename, job,
Decode(job, 'CLERK', 'Underpaid',
'MANAGER', 'Overpaid',
'SALESMAN', 'Havvaniceday',
'PRESIDENT', 'Who
is she?',
'No comment')
Comment_Col -- this is the column alias
From emp;
OUTPUT
ENAME JOB COMMENT_COL
KING PRESIDENT Who is she?
BLAKE MANAGER Overpaid
CLARK MANAGER Overpaid
JONES MANAGER Overpaid
FORD ANALYST No comment
SMITH CLERK Underpaid
ALLEN SALESMAN Havvaniceday
WARD SALESMAN Havvaniceday
MARTIN SALESMAN Havvaniceday
SCOTT ANALYST No comment
TURNER SALESMAN Havvaniceday
ADAMS CLERK Underpaid
JAMES CLERK Underpaid
MILLER CLERK Underpaid
Column BONUS Format A5
Select grade,
 Decode(grade, '1','15%',
 '2','10%',
'3','8%',
'5%')
BONUS
From salgrade;
OUTPUT
GRADE BONUS
1 15%
2 10%
3 8%
4 5%
5 5%
Select ename,
sal, deptno
From emp
Order By Decode(&orderby, 1, sal, 2, deptno, empno);
OUTPUT (when 2 is entered
ENAME SAL DEPTNO
KING 5000 10
CLARK 2450 10
MILLER 1300 10
JONES 2975 20
SMITH 800 20
FORD 3000 20
SCOTT 3000 20
ADAMS 1100 20
BLAKE 2850 30
ALLEN 1600 30
WARD 1250 30
JAMES 950 30
TURNER 1500 30
MARTIN 1250 30
Note that this
works here as all the attributes are numeric types.
Select deptno,
Sum(Decode(job, 'CLERK', 1, 0)) 'No. Of Clerks'
From emp
Group By
deptno
Having Sum(Decode(job, 'CLERK', 1, 0)) < 2;
OUTPUT
DEPTNO
No. Of Clerks
10 1
30 1
It may not be obvious what is happening
here at the first reading.
Try the following query first
Select deptno, job, Decode(job, 'CLERK', 1, 0)
From emp;
DEPTNO
JOB DECODE(JOB,'CLERK',1,0)
10 PRESIDENT 0
30 MANAGER 0
10 MANAGER 0
20 MANAGER 0
20 ANALYST 0
20 CLERK 1
30 SALESMAN 0
30 SALESMAN 0
30 SALESMAN 0
20 ANALYST 0
30 SALESMAN 0
20 CLERK 1
30 CLERK 1
10 CLERK 1
Now try, after removing job:
Select deptno,
Sum(Decode(job, 'CLERK', 1, 0))
From emp
Group By deptno;
DEPTNO
SUM(DECODE(JOB,'CLERK',1,0))
10 1
20 2
30 1
This query returns the number of
clerks (job = 'CLERK') in each
department.
Now
return to the original query.
Of course, in this case we could have
performed the same task by simply using
select
deptno, count(empno)
from
emp
where
job = 'CLERK'
group
by deptno
having
count(empno) <2
But the use of decode provides us with more
options - see later.
/*
Selective updates */
set
auto off
update
emp
set
sal = sal * decode(job, 'PRESIDENT', 1.4,
'MANAGER', 1.2,
'CLERK', 1.1,
1)
Select
* From emp
Rollback
Set
auto on
Note
that the function sign(value) returns
+1 if value is positive or -1 if value is negative.
So, what does this do?
Come up with another way
of doing this without using decode or sign */
Select sum(decode (sign (sal - nvl(comm,0)),1,1,0))
From
emp
12.3 The Case Function
This is a more recent addition to Oracle
and some argue, easier to understand. There is no longer any reason to use decode except that a
significant number of earlier applications will have been written using decode and
so application developers still need to be aware of its syntax and semantics.
There are two options for case namely searched
and simple.
12.3.1
Simple Case Syntax
The structure is very similar to that to be
found in many programming languages. I.e.
when <Expression1>
then <Result1>
when <Expression2>
then <Result2>
else <Resultn>
end
Note that all the Expressions have to
be of the same type as each other and all the Results also have to
be of the same type as each other but the Expressions and Results
can be of different types. Consider the
following simple examples
Select ename,
sal,
Case sal
When 5000 Then 'Very
Rich'
 Else 'Pay rise needed now'
 End 'Sal Comment'
From emp
OUTPUT
ENAME SAL Sal Comment
KING 5000 Very Rich
BLAKE 2850 Pay rise needed now
CLARK 2450 Pay rise needed now
JONES 2975 Pay rise needed now
FORD 3000 Rich
SMITH 800 Pay rise needed now
ALLEN 1600 Pay rise needed now
WARD 1250 Pay rise needed now
MARTIN 1250 Pay rise needed now
SCOTT 3000 Rich
TURNER 1500 Pay rise needed now
ADAMS 1100 Pay rise needed now
JAMES 950 Pay rise needed now
MILLER 1300 Pay rise needed now
Select ename,
job,
Case job
When 'CLERK' Then 'Underpaid'
When 'MANAGER' Then 'Overpaid'
When 'PRESIDENT' Then 'Who is she?'
When 'ANALYST' Then 'Gimme some tools'
When 'SALESMAN' Then 'Watch your pockets'
End 'Job
Comments '
From emp
Select ename,
job,
sal 'Old_salary',
Case job
When 'ANALYST' Then sal*1.1
When 'CLERK' Then sal*1.2
When 'MANAGER' Then sal*0.8
Else sal
End 'New_salary'
From emp;
ENAME JOB Old_salary New_salary
KING PRESIDENT 5000 5000
BLAKE MANAGER 2850 2280
CLARK MANAGER 2450 1960
JONES MANAGER 2975 2380
FORD ANALYST 3000 3300
SMITH CLERK 800 960
ALLEN SALESMAN 1600 1600
WARD SALESMAN 1250 1250
MARTIN SALESMAN 1250 1250
SCOTT ANALYST 3000 3300
TURNER SALESMAN 1500 1500
ADAMS CLERK 1100 1320
JAMES CLERK 950 1140
MILLER CLERK 1300 1560
Select grade,
Case grade
When
1 Then '15%'
When
2 Then '10%'
When
3 Then '8%'
Else
'5%'
End
BONUS
From salgrade;
OUTPUT
GRADE
BONUS
1 15%
2 10%
3 8%
4 5%
5 5%
Select sal,
deptno
From emp
Order by Case &orderby
When 1 Then sal
When 2 Then deptno
Else deptno
End
Explore - its use is
limited (note that the types of the 'results' have to be (roughly?) the same -
i.e. sal and deptno.
Select deptno,
Sum(Case
job When 'CLERK' Then 1 Else 0
End) 'No. Of Clerks',
Sum(Case
job When 'MANAGER' Then 1 Else 0
End) 'No. Of Managers'
From emp
Group
By
deptno
OUTPUT
DEPTNO
No. Of Clerks No. Of Managers
10 1 1
20 2 1
30 1 1
Make sure that the script given above above
makes sense.
Select deptno,
Sum(Case
job when 'CLERK' Then 1 Else 0
End)
'No. Of Clerks',
From emp
Group
By
deptno
Having Sum(Case job When 'CLERK' Then 1
Else
0 End) < 2
select deptno,
count(empno)
from emp
where job
= 'CLERK'
group by
deptno
having count(empno)
< 2
[There is a fundamental flaw with the script given below. It seeks to give percentage pay rises to
particular job categories. Run it and
correct it!]
Set
auto off
Update
emp
Set
sal = sal * (Case job
When
'PRESIDENT' Then 0.5
When 'MANAGER' Then 1.1
When 'CLERK' Then 1.5
End);
This is a more powerful implementation of
the case function.
The basic structure is
case
when <Condition1> then <Result1>
when <Condition2> then <Result2>
else <Resultn>
end
You can have up to 127 conditions.
Note that, as before, all the Results
also have to be of the same type.
N.B. The conditions are evaluated in order
and as soon as a condition is found that evaluates to true
then the processing stops and the corresponding
result is applied. Thus searched case
statements need to programmed carefully and it is expected that the conditions
included are mutually exclusive and exhaustive (i.e. cover all possibilities).
Consider the examples given below.
Compare and contrast 1(a) and 1(b). Which of them is clearer and less prone to
errors?
1(a)
Select ename,
Case
When sal >= 0 And
sal < 1000 Then 'Needs a pay rise'
When sal >=
1000 And sal < 2000 Then 'Needs to be curtailed'
When sal >= 2000 And sal < 3000 Then 'Needs
a pay cut'
else 'Rich'
End 'SalComm'
From emp
1(b)
Select ename,
Case
When sal < 1000
Then 'Needs a pay rise'
When sal < 2000
Then 'Needs to be curtailed'
When sal < 3000
Then 'Needs a pay cut'
Else 'Rich'
End 'SalComm'
From emp
Experiment with the following
as well.
Update emp
Set comm =
Case
When comm is null Then 0
When comm = 0 Then comm + 100
When comm > 0 then comm + 200
Else comm
end
Select Sum(Case When deptno = 10 Then sal End) d10,
Sum(Case When
deptno = 20 Then sal End) d20,
Sum(Case When
deptno = 30 Then sal End) d30
From emp
(different layout used)
select ename,
sal,
case
when hiredate like '%80'
then 1980
when hiredate like '%81' then 1981
when hiredate like '%82' then 1982
else 1900
end 'YEAR'
from emp
(different layout
used)
select ename,
case
when sal > (select avg(sal)from emp)
then 'Above Average'
when sal <(select avg(sal)from emp)
then 'Below Average'
else 'I do not believe it!'
end 'Comment'
from emp
Exercise 16
For each employee list their employee number along with their
commission or salary depending on whether they are a salesman or non-salesman
respectively.
An attempt to output details of
department numbers and a count of the number of salesmen they employ, as long
as they employ less than two salesmen is given by:
Select deptno,
count(*)
From emp
Where job = 'SALESMAN'
Group by deptno
Having count(*) < 2
Explain why this
will not work (you do not consider the
departments that have no staff .. for now) and write down the correct version.
[Background Reading
- Useful template for Testing Triggers as well]
13.0 Guidelines for Testing Constraints
N.B. These are only guidelines for an approach to the
documentation of testing column and table constraints that are defined
within Oracle's CREATE
TABLE clauses. There may well be cases which will involve special consideration (e.g.
the testing of some constraints may involve constructing decision tables).
The following notes make reference to the
Tables d1 and e1 (given below). The files
needed to create these files will be provided. N.B. it is likely that the command file containing the CREATE TABLE
command will contain a number of REM statements (or use /* */)
explaining any special comments regarding:
the choice of data types
the choice of constraints
referring, where possible, to the requirements specification. There is usually no need to make comments here
on all choices of data types and constraints (but these will appear in an
associated analysis/design documents).
REM **** Creating Table d1 ****
REM **** Add here any special comments ***
create table d1(
dno number(2) constraint pk_d1 primary key
constraint dno_pos check(dno in
dnam varchar2(6)
constraint unq_dnam unique
constraint upp_dnam
check(dnam = upper(dnam))
REM **** Creating Table e1 ****
REM **** Add here any special comments ***
CREATE TABLE e1(
eno number(3) constraint pk_e1 primary key
constraint eno_pos
check(eno > 0),
enam varchar2(6) constraint upp_enam
check(enam = upper(enam))
constraint nn_enam not null,
/* You could put a comment in here, over several lines if
necessary, but beware of cluttering your documentation */
dnumber number(2) constraint
fk_dnumber references d1(dno),
constraint crosscheck check(eno/10
>= dnumber and
eno/10
< dnumber + 10)
REM **** The crosscheck
constraint is to . . etc.
REM **** More comments
In general the
constraints Primary Key References (or Foreign Key Unique Not Null and the
use of Default need not be formally tested as it can be assumed that they work. However
it will be in your own interests to test them informally to ensure that your
understanding of the underlying semantics is correct and, possibly, to ensure
that they are actually there and in the right place! There is also, in general, no need to present
any formal documentation to test the data types such as Number(4) Varchar2(6) Date, etc., although in some
cases this may be necessary.
Of course the choice of constraints
and data types must conform to the requirements specification.
Thus, in general, the
strategy is to test the semantic
constraints that use the keyword CHECK This might require the use
of white box testing, black box testing and equivalence partitioning. However simple checks such as
CHECK(name =
UPPER(name)) and
CHECK(DEPTNO BETWEEN 1 AND 99)
use
standard SQL functions, and all the tester needs
to do is confirm that they achieve the required effect. The basic strategy is very similar to that
you have been used to for testing Java/Delphi/C programs.
Your
Test Plan will require you to explain how the testing is actually going to be
carried out, what data you are going to choose, and why.
You should also make
an attempt to show that your testing is complete and covers all possibilities. (In practice, sometimes this is difficult but this does not prevent you
from planning how you would attempt to test all the possibilities even if
within a particular context it may be impractical to do so, e.g. in a
time-constrained exercise!) This might require the use of typical values,
extreme values and (if feasible) invoke all
possible paths 'through the logic'.
Note, inserting valid data is also part of any testing regime.
It is usual to
include after the the test plan some form of tabular layout which contains, for
each test that is to be carried out, at
least the following information:
a test number (possibly related
to earlier documentation);
a description of the test (i.e.
what you are testing, and why is it necessary); (N.B. a list of tests that appear in some random order is confusing
for both the author and the person reading your work. The ordering and (consequent) numbering of
the tests must have some rational
basis);
the actual data
input for the test;
the expected or required
outcome. The expected outcome will often
require some form of hand calculation, suitably cross referenced: e.g. see page
nn
the actual outcome and any
accompanying system messages;
a reference to the location of
the actual output produced during the test (which you should also submit, to
show that the test has actually been carried out);
a statement indicating whether
the test has been successful or not (e.g. PASS/FAIL
where necessary (definitely for
all 'Fails') give a brief comment and/or
refer to other parts of your documentation where the matter is explained more
fully;
when the test was carried out
and who conducted the test.
The tabular layout suggested below may look
different to what you have seen in other courses but it contains all the essential information. Of course, if a test fails then ideally the
code should be corrected and the test run again! Tests that fail indicate a fundamental
problem that has not been resolved.
N.B. When
testing constraints you need to be very careful of possible 'conflicts' between Table and Column
constraints. See below.
The following tabular layout itemising the constraints and how, in
general, you intend to approach the testing process is highly recommended as it
helps you to focus on the task in hand. Working through the constraints table by table is one sensible approach. [We shall not be considering transitional or database
constraints in this section.]
The references to 'requirement number 4.3.3' etc. are to a hypothetical
Requirement Specification document, or simply a scenario in an assignment which
you may wish to re-write as a numbered list.
TABLE e1
|
Column
Constraint Name
|
Purpose
|
|
pk_e1
|
To ensure that the employee number is both unique and not null (i.e.
to implement entity/key integrity).
This is easily tested by attempting to enter two rows of data with
the same value of eno, along with
valid data for all the remaining attributes. This will be carried out but not included in the documentation.
|
|
eno_range
|
To ensure that the employee number is positive.
See user requirement number 4.3.3 on page 134.
check(eno
> 0) can be quite effectively (and comprehensively) tested by using three
values of eno , one
positive, one 0 and one negative (in each case all the other attributes must
have legal values).
|
|
upp_enam
|
To ensure that names are always entered
in upper-case.
See user requirement number 4.3.5 on page 135.
check(enam
= upper(enam)) can be quite effectively (and comprehensively) tested by attempting
to enter a value for enam that contains a lower case letter. (all the other
attributes must have legal values). [Debate whether one such test would
suffice or should there be a test for each possible position in the
string. We shall make the assumption
that the upper function does work correctly and that testing will be minimal
and need not be reported
|
|
nn_enam
|
An employee name cannot be null. No employee details can be entered without the name being known.
See user requirement number 4.3.6 on page 135.
Again the testing is simple. Enter a null value into enam, along with valid values for all the
other attributes.
|
|
fk_dnum
|
To ensure referential integrity (and thus employees can only be
allocated to departments that have been entered to the d1 table etc.
etc.). Here you should also explain
what kind of delete and update properties is required on the 'master' table
d1.
The level of detail here depends on the nature of what is
required. If we use 'on delete
restrict' and 'on update restrict' then we need to try and enter values of dnumber than do not
equal any of the values of dno that already exist in the d1 table. Likewise there should be attempts to delete
a row of d1 which contains a value of dno that currently exists as
a value of dnumber in the e1 table,
etc. In general there is no need to
report on these tests as we shall assume that the Oracle code actually does
work. Your tests are to see if you
have placed the right constraint on the right attribute(s).
|
|
Table
Constraint Name
|
Purpose
|
|
crosscheck
|
To ensure that employees in department 10 have employee numbers in
the range 100 - 199 and employees in department 20 are in the range 200 - 299
etc. The constraint we have used for this is simply:
constraint crosscheck
check(eno/10 >= dnumber
and
eno/10 <
dnumber + 10)
[This is a potentially tricky
test and all the possibilities should be carefully itemised. You should also make allowances for the
fact that there may be separate constraints on eno and dnumber (which there
are). A sensible initial strategy
might be to assume that the values of eno and dnumber are legal.
|
We now
need to record the outcomes of the tests we have
planned. The actual data
used can
be itemised above or given here (or both).
|
TEST
201
|
|
|
Table
|
|
|
Constraint
|
Crosscheck
|
|
Date
Of Test
|
12-Aug-1999
|
|
Name
of tester(s)
|
Sonny Terry
|
|
Purpose
Of Test
|
To test the case when eno is clearly too large for a given dnumber and so will fail the
crosscheck constraint.
|
|
Data
Entered
|
eno : 234, enam : 'BLOGGS', dno : 10,
together with other valid data for the remaining attributes
which should be listed here!
Comments: with
an eno of 234 the employee should be in department 20. If this choice of data does not obviously
break the constraint then further explanations may be required here)
|
|
Expected
Outcome
|
Insert not allowed with a message stating
that the crosscheck constraint has fired.
|
|
Actual
Outcome
|
As expected (with the
associated Oracle error message referring to crosscheck): see Page 368
for actual output.
|
|
Comments
|
Pass
|
(Qu. What other tests would you have on 'crosscheck'?)
|
TEST
304
|
|
|
Table
|
e1
|
|
Constraint
|
eno_range
|
|
Date
Of Test
|
11-Aug-1999
|
|
Name
of tester(s)
|
B. McGee
|
|
Purpose
Of Test
|
-1 below lower limit for eno and should thus be rejected
|
|
Data
Entered
|
eno : -1 , enam: 'BLOGGS', dnumber: 10 etc. etc. (N.B. all the other data values
which must be shown here i.e. for enam and dnumber must be chosen carefully
so as to not break any other constraints.)
|
|
Expected
Outcome
|
Insert not allowed with the firing of the eno_range constraint.
|
|
Actual
Outcome
|
As expected? (with associated Oracle error message referring to
eno_range): see Page 234 for details . BUT WHAT
ACTUALLY HAPPENS??? In fact a
different constraint has fired: which one? Why?
|
|
Comments
|
We would expect some analysis here
|
|
|
An effective way
of obtaining appropriate output is to use the spool command - see below.
13.1 Testing Constraints - some practical issues
It is likely
that all such detail will be relegated to an appendix.
Consider the following command file which
will be provided
Save the file as create_d1_e1.sql .
The role of the set commands will be
explained in class.
REM *** A
brief explanation of the set commands used
|
|
When used in a command file it suppresses
the display of SQL*Plus commands as they are executed. The effect/output of the commands is not
affected. Set Echo On will return you to the default mode.
|
|
|
When used in a command file this
suppresses the display that a command would output to the screen. It is often used when you are spooling
output to a text file. Set Term On will return you to the
default mode. */
|
set
echo off
set
term off
set
pause off
spool
created1e1.lis
set
echo on
drop
table e1
drop
table d1
REM
**** Creating Table d1 ****
REM
**** Add here any special comments ***
create
table d1(
dno number(2) constraint pk_d1 primary key
constraint dno_pos
check(dno in (10, 20, 30, 40, 50, 60)),
dnam varchar2(6) constraint unq_dnam unique
constraint upp_dnam
check(dnam = upper(dnam)))
REM
**** Creating Table e1 ****
REM
**** Add here any special comments
create
table e1(
eno number(4) constraint pk_e1 primary key
constraint eno_pos check(eno > 0),
enam varchar2(6) constraint upp_enam
check(enam = upper(enam))
constraint nn_enam not null,
dnumber
number(2) constraint fk_dnumber references d1(dno)
on delete cascade,
constraint
t_crosscheck
check(eno/10 >= dnumber and eno/10 < dnumber + 10)
REM **** Next two lines are optional
describe
d1
describe
e1
set
echo off
spool
off
set
pause on
set
echo on
set
term on
The following command file will also be
provided Save it as insert_d1_e1.sql
set
term off
set
echo off
set
pause off
spool
insertd1e1.lis
delete
from e1
delete
from d1
set
echo on
REM
** ** ** ** ** ** ****
REM
*** These inserts relate to the Testing Strategy
REM *** outlined in Section A.B, page xx
REM
*** CLEARLY A STRUCTURED APPROACH WILL
HAVE BEEN ADOPTED REM *** TO THE NUMBERING OF TESTS AND THEIR DISPLAY IN SOME
REM
*** SORT OF LOGICAL ORDER. HERE WE USE A
FAIRLY AD HOC
REM
*** APPROACH!
REM
***-------- ----- ------ ----- ----- ---------
REM
*** N.B The use of OPTIONAL below means
that it
REM
*** is optional to include these in your documentation. REM *** It is of course NOT OPTIONAL to
conduct these
REM
*** tests!!!
REM
** ** ** ** ** ** *************
REM
*** V A L I D D A T A *******
REM
*** so if not accepted need to check typing/table
REM
*** definitions ***
insert
into d1 values (10, 'TEN');
insert
into d1 values (20, 'TWENTY');
insert
into d1 values (30, 'THIRTY');
insert
into d1 values (40, 'FORTY');
insert
into d1 values (50, NULL);
REM
*** Test 801 ****
REM
*** Attempt to insert a value into dno outside valid
REM
*** range (i.e. 70)
insert
into d1 values (70, 'SEVEN');
REM
**** Test 903 ****
REM
**** Attempt to insert lower case dnam (OPTIONAL test)
insert
into d1 values (10,'ten');
REM
** ** ** ** *****
REM
**** Test 2001 *****
REM
**** OPTIONAL test for unique dnam ***
insert
into d1 values (60,'TEN')
REM
**** Etc. Etc.
REM
**** TESTING CONSTRAINTS ON TABLE e1 *****
REM
**** Firstly a set of VALID ENTRIES *****
insert
into e1 values (100,'BLOGGS',10);
insert
into e1 values (205,'MOOSE',20);
insert
into e1 values (560,'NIXON',50);
insert
into e1 values (120,'CRAGG',10);
insert
into e1 values (334,'LONG',30);
insert
into e1 values (447,'BLOGGS',40);
REM
**** Test 42 ****
REM
**** OPTIONAL Data Type check on enam ****
insert
into e1 values (101,'SMITHSONIAN',50);
REM
**** Test 4006 ****
REM
**** OPTIONAL null test on enam ****
insert
into e1 values (101,null,10);
REM
**** Test 5001 ****
REM
**** OPTIONAL Referential Integrity check****
insert
into e1 values (121,'BLOGGS',60);
REM
**** Test 5002
REM
**** OPTIONAL Referential Integrity check ***
insert
into e1 values (122,'MUGG',11);
REM
**** Test 1 ****
REM
**** eno_range : see page aa
insert
into e1 values (-1,'BLOGGS',10);
REM
**** Test 2 ****
REM
**** crosscheck : see page ab **
insert
into e1 values (601,'MARS',40);
REM
**** Test 43 ****
REM
**** crosscheck on Table e1 : see page ac
insert
into e1 values (234,'PRATT',10);
REM
**** Test 44 ****
REM
**** crosscheck on Table e1 : see page ac
insert
into e1 values (234,'PRATT',30)
REM
**** ETC. ETC. ETC.
REM ** ** ** ** ** ** *************
set
echo off
spool
off
set
pause on
set
term on
set
echo on
Now invoke SQL (if you
need to) and at the SQL> prompt type, in turn:
@create_d1_e1
@insert_d1_e1
The spool commands contained in the
above .sql command files will create
two lis files, which contain the spooled output for
the above commands. You need to examine
these two files create_d1_e1.lis and insert_d1_e1.lis using your Text Editor (e.g.
Notepad) to check on the output. The
contents of insert_d1_e1.lis should contain be something like that given below (the
content might vary, but the essential detail will be the same). Check the content of create_d1_e1.lis for yourselves by loading it using your Text Editor. Not all the file is included
here.
NB a file of this
form is the evidence that you need to verify your testing and is often required
in assignments
SQL> REM **** V A L I D D A T A *******
SQL> REM **** so if not accepted
need to check typing/table
SQL> REM definitions ***
SQL> insert into d1 values (10,'TEN');
1 row created.
Commit complete.
SQL> insert into d1 values (20,'TWENTY');
1 row created.
Commit complete.
SQL> insert into d1 values (30,'THIRTY');
1 row created.
Commit complete.
SQL> insert into d1 values (40,'FORTY');
1 row created.
Commit complete.
SQL> insert into d1 values (50,
NULL);
1 row created.
Commit complete.
SQL>
SQL> REM **** Test 801 ****
SQL> REM **** Attempt to insert a
value into dno outside
SQL> REM **** valid range (i.e. 70)
SQL> insert into d1 values (70,'SEVEN');
insert into d1 values (70,'SEVEN')
*
ERROR at line 1:
ORA-02290: check constraint
(OPS$DL1.DNO_POS) violated
SQL>
SQL> REM ** Test 903 ****
SQL> REM ** Attempt to insert lower
case dnam (OPTIONAL test)
SQL> insert into d1 values (10,'ten');
insert into d1 values (10,'ten')
*
ERROR at line 1:
ORA-02290: check constraint
(DL1.UPP_DNAM) violated
SQL>
SQL> REM
** ** ** ** *****
SQL> REM **** Test 2001 *****
SQL> REM **** OPTIONAL test for
unique dnam ***
SQL> insert into d1 values (60,'TEN')
2
SQL> REM **** Etc. Etc.
SQL>
SQL> REM **** TESTING CONSTRAINTS ON
TABLE e1 *****
SQL> REM **** Firstly a set of VALID
ENTRIES *****
SQL> insert into e1 values (100,'BLOGGS',10);
1 row created.
Commit complete.
SQL> insert into e1 values (205,'MOOSE',20);
1 row created.
Commit complete.
SQL> insert into e1 values (560,'NIXON',50);
1 row created.
Commit complete.
SQL> insert into e1 values (120,'CRAGG',10);
1 row created.
Commit complete.
SQL> insert into e1 values (334,'LONG',30);
1 row created.
Commit complete.
SQL> insert into e1 values (447,'BLOGGS',40);
1 row created.
Commit complete.
SQL>
SQL> REM **** Test 42 ****
SQL> REM **** OPTIONAL Data Type
check on enam ****
SQL> insert into e1 values (101,'SMITHSONIAN',50);
insert into e1 values (101,'SMITHSONIAN',50)
*
ERROR at line 1:
ORA-01401: inserted value too large for
column
SQL>
SQL> REM **** Test 4006 ****
SQL> REM **** OPTIONAL null test on
enam ****
SQL> insert into e1 values
(101,null,10);
insert into e1 values (101,null,10)
*
ERROR at line 1:
ORA-01400: mandatory (NOT NULL) column
is missing or NULL during insert
SQL>
SQL> REM **** Test 5001 ****
SQL> REM **** OPTIONAL Referential
Integrity check****
SQL> insert into e1 values (121,'BLOGGS',60);
insert into e1 values (121,'BLOGGS',60)
*
ERROR at line 1:
ORA-02291: integrity constraint
(DL1.FK_DNUMBER) violated - parent key not
found
SQL>
SQL> REM **** Test 5002
SQL> REM **** OPTIONAL Referential
Integrity check ***
SQL> insert into e1 values (122,'MUGG',11);
insert into e1 values (122,'MUGG',11)
*
ERROR at line 1:
ORA-02291: integrity constraint (DL1.FK_DNUMBER)
violated - parent key not
found
SQL>
SQL> REM **** Test 1 ****
SQL> REM **** eno_range : see page
aa
SQL> insert into e1 values (-1,'BLOGGS',10);
insert into e1 values (-1,'BLOGGS',10)
*
ERROR at line 1:
ORA-02290: check constraint
(OPS$DL1.T_CROSSCHECK) violated
SQL>
SQL> REM **** Test 2 ****
SQL> REM **** crosscheck : see page
ab **
SQL> insert into e1 values (601,'MARS',40);
insert into e1 values (601,'MARS',40)
*
ERROR at line 1:
ORA-02290: check constraint
(DL1.T_CROSSCHECK) violated
SQL>
SQL> REM **** Test 43 ****
SQL> REM **** crosscheck on Table e1
: see page ac
SQL> insert into e1 values (234,'PRATT',10);
insert into e1 values (234,'PRATT',10)
*
ERROR at line 1:
ORA-02290: check constraint
(OPS$DL1.T_CROSSCHECK) violated
SQL>
SQL> REM **** Test 44 ****
SQL> REM **** crosscheck on Table e1
: see page ac
SQL> insert into e1 values (234,'PRATT',30)
2
SQL> REM **** ETC., ETC., ETC.
SQL>
REM ** ** ** ** ** ** *************
SQL>
SQL> set echo off
Exercise.
Consider again the original Emp table. There is an implied constraint that only
those with the job SALESMAN have commission. How would you attempt to enforce this and, more importantly, how would
you set out to test that what you had implemented was correct.
13.3 More On Command files
It is very likely that in your assignment
you will be creating a number of tables and populating them with sample
data. You may be forced to re-create
your tables because of a design error. As you will appreciate, tables have to be created and dropped in the
correct order.
It
might be useful for you to create (at least) two 'master command files' with
the following structure.
Call one setup.sql and it will contain a list of
commands such as
drop table1
drop table2
drop table3
create table3( . )
create table2( . )
create table3( . )
Thus typing @setup at the SQL> prompt will drop and build your complete
database of tables. (You may wish to include commands to
drop/create sequences and views as well).
The second command file could be reserved
for populating the tables with valid data. Call it, say, populate.sql and it will contain a set
of insert
into commands. This can be invoked by typing @populate at the SQL> prompt.
It is possible that you may have to test
the constraints again after re-building the database and before populating the table with valid data. Make
sure that you have a set of associated command files to allow you to do this as
well.
To display the contents of the tables all
you need do is to print out (spool) the output from a set of
select 'an appropriate selection of
columns'
from tablename;
commands. However it is possible that the output from some tables will not have 'one
row per line'.
Exercise
What does @@
allow you to do?
Background
reading
14.0 Testing
SQL Commands
N.B. These notes are only guidelines
and each SQL command will have to be considered on its merits. However, the following will give you an indication
of what needs to be done.
When presenting your documentation you need
to
explain your strategy;
choose appropriate test data and
justify
your choices;
indicate the expected output
showing clearly why it is the expected output (which may need to be 'hand-worked' and/or reference a table/s or
particular row/s of a table);
comment on the process (the
minimum being pass/fail).
The following example uses the tables you are using in your SQL tutorial.
Assume that a question you need to answer is labelled 3.4.
Question 3.4
Find the
year in which most people, currently on grade 2, were appointed. Display the answer with the heading 'Year Of
Hire', with the year displayed in the format 'YYYY', together with the number
of people who satisfy the condition under the heading 'How Many' with the 'Many'
below the 'How'.
Pause and reflect on
how you might tackle this problem. It
isn't as easy as it looks.
14.1
A Suggested Layout
In the section of
your documentation called 4.0
Testing Queries (the 4.0 is clearly arbitrary) you could have the following structure.
4.0 Testing Queries
[Introductory
comment, where to find the files, the naming conventions you have used and
brief instructions on how to run the files. This could well be précis of what you have include in your User
Documentation].
Query 1 (or Query 3.1 or whatever)
4.1.1 The
Question
4.1.2 Proposed
solution
4.1.3 Testing
Strategy
4.1.4 Itemised Reports on the Testing
4.4 Query 4
4.4.1 The Question
Find
the year in which most people, currently on grade 2, were appointed. Display the answer with the heading 'Year Of
Hire', with the year displayed in the format 'YYYY', together with the number
of people who satisfy the condition under the heading 'How Many'.
Proposed Solution
REM *** Author D.H.Lewis ***
REM *** Date Of Last Update 14-DEC-99 ***
REM *** Reason for update was .
REM *** Possible ALL updates might be recorded here.
REM ~~~~~~~~~~~~~~~~~~~~~~~~~~~~~~~~~~~~~~~~~~~~~~~~~~
REM **** The sub-query
returns . . .
REM *** The use of
to_char(hiredate, 'YYYY') is to
REM ~~~~~~~~~~~~~~~~~~~~~~~~~~~~~~~~~~~~~~~~~~~~~~~~~~~~~~
Select substr(to_char(hiredate,'YYYY'),1,12)'Year Of Hire',
count(*) 'How Many'
From emp e,
salgrade s
Where e.sal between
s.losal and s.hisal
And s.grade = 2
Group by to_char(hiredate, 'YYYY') -- Quite subtle!
Having count(*) =
(Select max(count(*)) --
Subquery looks similar. Why?
From emp e,
salgrade s
Where e.sal between s.losal and s.hisal
And s.grade = 2
Group by to_char(hiredate,
'YYYY'))
The output from the above file can be spooled in the
usual way.
4.4.3 Testing Strategy
Reminder: there is
no fixed 'off the shelf' method and each case will have to be considered on its
merits. Clearly the programmer could
decide to test the sub-query separately to ensure that it was returning the
expected data. E.g. what exactly is the
sub-query
Select max(count(*))
From emp e,
salgrade s
Where e.sal between s.losal and s.hisal
And s.grade = 2
Group by to_char(hiredate, 'YYYY');
supposed to do?
(It may not be that obvious at first sight. What if we removed the line s.grade = 2? Try it!). Having determined what the sub-query returns we could then test the main
query using
Select substr(to_char(hiredate,'YYYY'),1,12)'Year Of Hire',
count(*) 'How Many'
From emp e, salgrade s
Where e.sal between
s.losal and s.hisal
And s.grade = 2
Group by to_char(hiredate, 'YYYY')
Having count(*) = 'whatever
value is returned by the sub-query';
At first sight this query is
not that easy to analyse. Depending on
your level of confidence you may also wish to break the query down into stages
and, for example, test to see if the join is working correctly (it isn't a 'normal
equi-join') and then add each clause in
turn examining the effect of each. In this case it may well have been worth testing the role of
Group by to_char(hiredate, 'YYYY')
Which may not be all
that obvious at first sight.
For some queries you
may wish to invoke 'boundary value testing' or if the query has some
particularly complex logic use a Decision Table or a Truth Table.
The final, essential,
stages may just invoke Black Box Testing which simply focuses on the overall
functionality of the query without considering each component of the
query. Many 'simple' SQL queries can be
tackled this way but the analysis and
explanation of the expected output must be clearly itemised.
If we consider a
Black Box Strategy then the cases for consideration (i.e. The Test Plan)
could include:
There is one year which has the maximum number on grade 2.
The data needed to test this case is currently in the emp table when there are
2 people on grade 2 appointed in 1981. See the listing of the emp table on page xy.
There are two years with the
same maximum, of 1, currently on grade 2.
The data needed to test this case can be obtained by deleting . from the emp table.
There are two years with the
same maximum, greater than 1, currently on grade 2.
The data needed to test this case can be obtained by inserting the row
(7921, 'TIRED', 'CLERK',
7782, '24-JAN-82', 1350, null, 10)
into the emp table with the purpose of
increasing the number of people on grade 2 hired in 1982 to 2 which is equal to
the current maximum for 1981.
There are more than two years
with the same maximum number currently on grade 2.
The
data needed to test this case .
There are no employees on grade
2.
The data needed
to test this case can be obtained by deleting all employees currently on grade
2. (Aside: how would you do this?)
This set
of cases is not complete! What would you add? When can you be sure that you have considered
all the possibilities?
One of the
key roles in drawing up a Test Plan is to try and ensure 'completeness' i.e. to answer the question 'have we considered all the possibilities?'. In some cases such 'exhaustive testing' will
be very time consuming and only a well defined subset of cases will be
chosen. However it will also be clear
what cases have not been properly tested and, possibly, placed in the context
of some risk analysis.
Please
note that alterations to a table can be temporarily enforced by using the
following strategy.
Use the command set auto off at the SQL> prompt
Now carry out the
inserts/deletes/updates on the relevant tables.
Show the data currently in the
table(s).
Execute the query, spooling the
output as appropriate.
Undo the changes to the
tables(s) by typing the rollback command at the SQL> prompt.
E.g. a typical
command file could look like this:
Set auto off
Spool question34
Insert
into emp values (7921, 'TIRED', 'CLERK', 7782, '24-JAN-82', 1350, null, 10);
REM
*** Confirm the data in Emp (optional in this case?)
Select
* from emp;
REM
*** Now run the query
Start
question34
Spool
off
Rollback;
The data chosen to test each of these
case must be clearly documented and
justified as being appropriate. Please
document the Test Plan using the following tabular layout.
4.4.4 Structured Presentation
of Testing
|
TEST 4.4.3.1
|
|
|
Name of tester
|
E. Clapton
|
|
Date of test
|
1-FEB-99
|
|
Purpose of test
|
To test the case where there is one year with a maximum number of
appointments
|
|
Selected Test
Data
|
Data as shown
in Table listing for Emp on Page xx.
|
|
Data Input
|
Not applicable
|
|
Expected Output
|
One row, under the relevant headings, with data (1981, 2). The Emp table has 11 employees appointed in
1981 and currently 2 of them are on grade 2. The only other years that have appointments are 1980, 1982 and
1983. In each of those years the
number on grade 2 are 0, 1 and 0 respectively.
(N.B. The expected output
could involve prolonged calculations or considerable cross-referencing. It may be appropriate in these cases to
refer the reader to an appendix)
|
|
Actual Output
|
As expected. See page 807 (important to include this reference)
|
|
Comment
|
Pass
|
|
|
|
TEST 4.4.3.3
|
|
|
Name of tester
|
B. B. King
|
|
Date of test
|
12-Nov-99
|
|
Purpose of test
|
To test if the query works when there are two years with a maximum
greater than 1.
|
|
Selected Test
Data
|
Insert the row
(7921, 'TIRED',
'CLERK', 7782, '24-JAN-82', 1350, null, 10)
into the emp table with the purpose of increasing the number of
people on grade 2 hired in 1982 to 2 which is equal to the current maximum
for 1981. See selected table listing
on page xy.
(N.B. It is not necessary
to always list the complete table and in some cases, as here, it may not be
necessary to list the table at all. However the test must be capable of being replicated easily)
|
|
Data Input
|
Not applicable
|
|
Expected Output
|
Two rows (1981,
2) and (1982, 2). See Selected Test
Data above.
|
|
Actual Output
|
As
expected. See page yy.
|
|
Comment
|
Pass
|
|
|
|
TEST 4.4.3.5
|
|
|
Name of tester
|
C. Berry
|
|
Date of test
|
14-Nov-99
|
|
Purpose
|
To consider the
case when there is no-one on grade 2.
|
|
Selected Test
Data
|
The Emp table
(see page xy) with the following rows deleted
|
|
Data Input
|
Not applicable
|
|
Expected Output
|
No data
displayed as there is no-one on grade 2.
(It is conceivable that a 'maximum of 0 for each year is also an
acceptable display)
|
|
Actual Output
|
No rows
selected. See page ab.
|
|
Comment
|
Pass. The query works as specified except that the output obtained when there are no employees on
grade two is unsatisfactory. See
comment in Expected Output.
|
It is very important that
the documentation of testing is clear and that it is easy to audit. A simple
consistent numbering system as used above will help. Just presenting the itemised reports (4.4.4
above) is not sufficient. It is very important to leave the reader in
no doubt about why you are claiming what the Expected Outcome is. You may well need to refer to tables (page reference
please) plus amendments made to those tables itemised in the row Selected Test
Data.
Notes.
The output from a test
must not be edited in any way
You must not include
the tests that fail unless they are your final attempt at the query. Of course the purpose of testing is the
locate and remove errors
15.0 The Data Dictionary
The data dictionary in Oracle is a
repository of metadata i.e. data about the database you are building. It stores information about all the Tables,
Views, Sequences and other objects that you have created. Occasionally you might find it useful to
retrieve some information from the data dictionary. The system provides a view called DICT that
allows you to view what tables/views exist in the data dictionary.
Try out the following commands (i.e. type
them at the SQL> prompt).
and then
Select table_name, comments
From Dict
Where table_name like 'USER%';
/* table_name is a column name of Dict */
The system will return a list of all table
names that start with USER. These are the ones that are most likely to
be of use to you. (You could try Select
* from Dict if you wish!).
Some of these views are listed below, there are many, many more! #
You will need to format the output or make
a selection of the columns you wish to see.
For example to determine the columns
available in user_tables use
describe user_tables
|
Table_Name
|
Comments
|
|
USER_CATALOG or CAT
|
Contains all the Tables, Views, Sequences
etc. owned by the user
|
|
USER_TABLES or TAB
|
Description of users own tables
|
|
USER_VIEWS
|
Description of users own views
|
|
USER_SEQUENCES
|
Guess what!
|
|
USER_CONSTRAINTS
|
Constraint definitions on user's tables
|
|
USER_TRIGGERS
|
Stores information about triggers defined
by the user
|
|
USER_CONS_COLUMMS
|
To be completed by the reader
|
|
USER_OBJECTS
|
To be completed by the reader
|
|
USER_ERRORS
|
To be completed by the reader
|
|
USER_INDEXES
|
To be completed by the reader
|
Exercise
(Note: using Describe will help)
Explore the information stored
in CAT, TAB and USER_CONSTRAINTS.
Use Describe first and then select the columns you wish to view. N.B. Table_names and column_names
are stored as strings of upper-case letters and so you will have to use
conditions such as .
table_name
= 'EMP' etc.
Create the following command
file. You may wish to type desc dict first to check what is going
on.
Column table_name Format
a30
Column comments Format a40
Select * from dictionary
Where table_name like USER%
Order by table_name;
Now run the
file and observe.
What does the output from this query tell you?
Select constraint_name, constraint_type
From user_constraints
Where table_name = 'EMP';
OUTPUT
CONSTRAINT_NAME C
SYS_C001646273 C
SYS_C001646274
C
EMP_PRIMARY_KEY P
EMP_SELF_KEY R
EMP_FOREIGN_KEY R
Explore the built in tables/views USER_OBJECTS and USER_SOURCE by
using the commands
DESC USER_OBJECTS
DESC USER_SOURCE
Observe
the columns/ attributes and see what you can find out about them.
Try,
for example, running the queries:
Select name,
text
From user_source
Where name
Like '%DISPLAY%'
Select object_id,
object_name
From user_objects
Where object_type
= 'PROCEDURE'
16.0 Character String Comparison Rules
Character values are compared using one of
two comparison rules
blank-padded
non-padded
16.1 Blank Padded Comparison Semantics
(used by Oracle when both strings are of
the type Char)
If the strings are of equal length then the
conventional character by character comparison takes place.
If the strings are of different lengths
then Oracle adds blanks (spaces) to the end of the shorter one. The comparison is then carried out using a
conventional character by character comparison until two differing characters
are found.
Examples D is used to represent a blank)
'xy' < 'xz'
'Ab' < 'ab'
'abcD' = 'abcDD' (as the left hand side is
padded out to 'abcDD
'abc' > 'ab' (i.e. 'abc'
> 'abD' as 'c' > 'D
16.2 Non-Padded Comparison Semantics
(used by Oracle when one or both of the strings is of type Varchar2)
If the strings
are of equal length then the conventional character by character comparison
takes place.
If the strings
are of differing lengths then if they are identical up to the end of the
shorter one then the longer one is deemed to be greater.
Examples
'xy' < 'xz'
'Ab' < 'ab'
'abc' < 'abcD
'abc' > 'ab'
Background Reading
17.0 Extracting Data from Oracle to a Flat
File
17.1 Types Of Output Files
There are four
types of output file you can produce when extracting data using SQL*Plus:
Delimited Columns
Fixed Width Columns
DML
DDL
17.2 Delimited Files
Delimited Files use a
special text character to separate each data value in a record. Typically the delimiter is either a TAB or a
comma. When a comma is used the files
are often called comma separated value
or CSV files.
E.g. (from the Dept
Table) a CSV file could look like
ACCOUNTING NEW YORK
RESEARCH DALLAS
SALES CHICAGO
OPERATIONS BOSTON
17.3 Fixed-Width Files
Each column is a certain width. E.g.
10ACCOUNTINGNEW
YORK
20RESEARCH DALLAS
30SALES CHICAGO
40OPERATIONSBOSTON
This will not be covered this year
17.4 DML
That is any INSERT, UPDATE, DELETE etc. statement. This will not be covered this year.
17.5 DDL
For example a statement including a CREATE or ALTER command. This will
not be covered this year
17.6 Limitations of SQL*Plus for Data Extraction
Maximum line length is 32,767
characters
It only handles the extraction
of basic data types such as NUMBER, VARCHAR2, DATE, etc. (and not complex types
such as BLOBs)
17. 6 Extracting the Data
Basic Steps
Formulate the query
Format the data
Spooling the output
(and preferably make
the script user-friendly!)
17.6.1 Formulate the query
E.g.
Select empno, ename, hiredate, sal
From emp;
17.6.2 Format the data
Modify the query so
that it returns a single long expression that combines the columns together in
the format you want in your output file. You will have to include text literals so that the commas appear in this
output. We shall initially consider the
problem of creating a CSV file that can be read by Microsoft Excel. We can use
Oracle's To_Char function to convert all the
data into character format.
||'''
||ename
||To_char(hiredate,'MM-DD-YYYY')
||To_char(sal)
From emp
Oracle's To_char function has been used to explicitly convert numeric fields to text
strings. And, incidentally (and this is
not strictly necessary as you could use the default date format) To_char has
also been used to change the default
format of hiredate.
The
use of the concatenation operator should be obvious.
The output from this
file (minus the heading) is :
7369,'SMITH',12-17-1980,800
7499,'ALLEN',02-20-1981,1600
7521,'WARD',02-22-1981,1250
7566,'JONES',04-02-1981,2975
7654,'MARTIN',09-28-1981,1250
7698,'BLAKE',05-01-1981,2850
7782,'CLARK',06-09-1981,2450
7788,'SCOTT',12-09-1982,3000
7839,'KING',11-17-1981,5000
7844,'TURNER',09-08-1981,1500
7876,'ADAMS',01-12-1983,1100
7900,'JAMES',12-03-1981,950
7902,'FORD',12-03-1981,3000
7934,'MILLER',01-23-1982,1300
Note that the name
has been placed in quotes. This has been
done to cover the possibility that an employee's name could contain a comma.
17.6.3 Spooling the output
To activate the
output it can be spooled to a text file and then activated in the usual
way. We shall concentrate on CSV files.
We need to make the parameter linesize large enough to accommodate the longest possible line. Use something like SET LINESIZE 120
Turn off all pagination feature
by using SET PAGESIZE 0. This will turn off all column headings, page
headings, page headers, page breaks etc.
Turn feedback off with SET FEEDBACK OFF
Eliminate trailing spaces with
the command SET
TRIMSPOOL OFF
REM *** This script extracts data from the EMP table
REM *** and writes it to a CSV file.
PROMPT This script create
a CSV file
PROMPT containing details
from the Emp table.
PROMPT
Pause Press ENTER to continue or CTRL+C to abort.
ACCEPT Output_file CHAR PROMPT 'Enter the name of the output file >'
SET PAUSE OFF
SET LINESIZE 136
SET PAGESIZE 0
SET FEEDBACK OFF
||'''
||ename
||To_char(hiredate,'MM-DD-YYYY')
||To_char(sal)
From emp
SPOOL OFF
-- Reset the SQL*Plus environment
SET LINESIZE 78
SET PAGESIZE 24
SET PAUSE ON
SET TERMOUT ON
If the name of the file you entered was,
say, extract_emp then the name of the
file that Oracle will create is extract_emp.lst which will contain
7369,'SMITH',Dec-80,800
7521,'WARD',Feb-81,1250
7566,'JONES',Apr-81,2975
7654,'MARTIN',Sep-81,1250
7698,'BLAKE',May-81,2850
7782,'CLARK',Jun-81,2450
7788,'SCOTT',Dec-82,3000
7839,'KING',Nov-81,5000
7844,'TURNER',Sep-81,1500
7934,'MILLER',Jan-82,1300
Rename this file as EXTRACT_EMP.CSV and load it into Excel.
(Use File
+ Open then go to Files of type.. and choose text files (which includes CSV files.)
|
SMITH
|
Dec-80
|
|
|
ALLEN
|
Feb-81
|
|
|
WARD
|
Feb-81
|
|
|
JONES
|
Apr-81
|
|
|
MARTIN
|
Sep-81
|
|
|
BLAKE
|
May-81
|
|
|
CLARK
|
Jun-81
|
|
|
SCOTT
|
Dec-82
|
|
|
KING
|
Nov-81
|
|
|
TURNER
|
Sep-81
|
|
|
ADAMS
|
Jan-83
|
|
|
JAMES
|
Dec-81
|
|
|
FORD
|
Dec-81
|
|
|
MILLER
|
Jan-82
|
|
APPENDIX 1
The ROWID 'Data Type
Each row in a database has an address. You can examine this address by querying the
pseudo column ROWID.
E.g.
Select rowid, ename, hiredate
From emp;
Where deptno = 30;
The values output for the rowid column are
hexadecimal strings with the format
block.row.file. An example could be 000000E.00001.00003 which identifies it as the second row (remember
counting starts at 00000) of the fourteenth data block in the third data file
(annoyingly, for files the counting starts at 1!).
Normally each row of each table has a
unique value for rowid. However it is
possible for two rows from different table to have the same rowid if the tables
are in the same cluster. You can query a
table using rowids but it is not that usual. However access via a rowid is the fastest means of accessing an
individual row. The rowids are not
actually stored in the database.
(note the structure of Rowid has changed in
Oracle 8 to accommodate partitioning).
Exercise
Use the Oracle SQL reference file provided
to discover all you can about ROWNUM.
APPENDIX 2
Currency
The To_Char function can also be used to
convert a value of Number data type
to a value of Varchar2 data type.
Type in the command
Select to_char(sal,'L9,999',' nls_currency = ''£'' ') sal
From emp;
and observe.
N.B.
The format models do not affect the
actual internal representation of the column value. They only affect how the column value is
displayed.
APPENDIX 3
Smart Quotes (or Curly Quotes)
By default Word (and other Word processing
packages) will usually use the smart version of quotes when you type. Examples of smart quotes are
"Hello" and 'DATA'.
The ordinary version of these quotes, which
is what you need for SQL (and other programming languages) look like this
'Hello' and 'DATA'.
If you cut and paste from a Word document
into SQL then using the smart quotes will generate an error. Thus, switch them
off.
In Word 2003 by
- On the Tools menu,
click AutoCorrect Options, and then click the AutoFormat As You
Type tab.
- Under Replace as you type,
select or clear the 'Straight quotes' with 'smart
quotes' check box.
Note You can find and replace all instances of
single or double curly quotes with straight quotes in your document. To do
this, clear the 'Straight quotes' with 'smart quotes'
check box on the AutoFormat As You Type tab. On the Edit menu,
click Replace. In both the Find what and Replace with
boxes, type ' or ', and then click Find Next or Replace
All.
In
Word 2007
Click the Microsoft Office Button  ,
and then click Word Options.
,
and then click Word Options.
Click Proofing, and then click
AutoCorrect Options.
In the AutoCorrect dialog box, do
the following:
Click
the AutoFormat As You Type tab,
and under Replace as you type,
select or clear
Click
the AutoFormat tab, and under Replace, select or clear the 'Straight quotes' with "smart
quotes" check box.